Kubeflow#
Important
The kubeflow integration requires soopervisor>=0.7
Important
The Kubeflow tutorial is in beta! Got questions or found issues? Reach out to us on Slack.
This tutorial shows you how to export a Ploomber pipeline to Kubeflow.
If you encounter any issues with this tutorial, let us know.
Note
This tutorial uses cloud storage (S3 or Google Cloud Storage). In addition, it runs on the local cluster local storage for faster data fetch.
Pre-requisites#
condaSee instructions hereInstall Ploomber with
pip install ploomber
Note
When installing Kubeflow, you must use a strong enough VM to meet the
basic requirements. This tutorial assumes the Kubeflow is configured and
you’re running within this cluster. Another option is to run the tutorial
locally and upload the final ploomber_pipeline.yaml to Kubeflow.
Instructions#
First, let’s install ploomber:
pip install ploomber
Let’s now pull some sample code:
# get example
ploomber examples -n templates/ml-intermediate -o ml-intermediate
cd ml-intermediate
Since each task executes in a different Docker container, we have to configure
cloud storage for tasks to share data. Modify the environment.yml file and
add the appropriate dependency:
# content...
- pip:
  # dependencies...

  # add your dependency here
  - boto3 # if you want to use S3
  - google-cloud-storage # if you want to use Google Cloud Storage
We also need to configure the pipeline to use cloud storage, open
the pipeline.yaml file, and add the following next to the meta section.
meta:
    # some content...

clients:
    File: clients.get_s3
meta:
    # some content...

clients:
    File: clients.get_gcloud
Now, edit the clients.py file, you only need to change the bucket_name
parameter for the corresponding function. For example, if using a bucket with
the name bucket-name and S3, clients.py should look like this:
from ploomber.clients import S3Client

def get_s3():
    return S3Client(bucket_name='bucket-name',
                    parent='ml-intermediate',
                    json_credentials_path='credentials.json')
from ploomber.clients import GCloudStorageClient

def get_gcloud():
    return GCloudStorageClient(bucket_name='bucket-name',
                                parent='ml-online',
                                json_credentials_path='credentials.json')
To authenticate to the cloud storage service, add a credentials.json
file in the project root (the same folder that has the environment.yml
file.
{
    "aws_access_key_id": "YOUR-ACCESS-KEY-ID",
    "aws_secret_access_key": "YOU-SECRET-ACCESS-KEY"
}
{
    "type": "service_account",
    "project_id": "project-id",
    "private_key_id": "private-key-id",
    "private_key": "private-key",
    "client_email": "client-email",
    "client_id": "client-id",
    "auth_uri": "https://accounts.google.com/o/oauth2/auth",
    "token_uri": "https://oauth2.googleapis.com/token",
    "auth_provider_x509_cert_url": "https://www.googleapis.com/oauth2/v1/certs",
    "client_x509_cert_url": "https://www.googleapis.com/robot/v1/metadata/x509/service-account.iam.gserviceaccount.com"
}
Note
When running with local storage, Kubeflow takes the product path and name
and stores it accordingly to its temporary outputs folder. You will need
to set the path of the products in the pipeline.yaml (the file that
defines the pipeline - above) to:
product: '{{root}}/product/data/get.parquet' note how the product
name appears in the path (mandatory). In addition we can see below that for
the nb and model products we set the path according to their names.
This is how your pipeline.yaml file should look like if you’re using GCP:
meta:
  jupyter_functions_as_notebooks: True
  import_tasks_from: partial.features.yaml

clients:
  File: clients.get_gcloud

tasks:
  - source: tasks.get.fn
    name: get
    product: '{{root}}/product/data/get.parquet'
    params:
      sample: '{{sample}}'

  - source: fit.py
    name: fit
    product:
        nb: '{{root}}/nb/data/nb.html'
        model: '{{root}}/model/data/model.pickle'
Important
Make sure to adjust those files to have the same output structure: partial.features.yaml and pipeline.serve.yaml.
In addition, we also need to configure the env files to the right root location.
Make sure in these files env.local.yaml, env.serve.yaml and env.yaml
the root is set to 'outputs' in a similar fashion to the env.yaml below:
root: 'outputs'
sample: False
Let’s now create the virtual environment:
# configure environment
conda env create --file environment.yml

# activate environment
conda activate ml-intermediate

# generate lock file
conda env export --no-build --file environment.lock.yml
Let’s now verify that everything is configured correctly:
ploomber status
We now export the pipeline to Kubeflow:
soopervisor add train --backend kubeflow
Note
You don’t have to install soopervisor manually; it should’ve been
installed when running ploomber install. If missing, install it with
pip install soopervisor.
soopervisor add creates a few new files. Let’s configure
soopervisor.yaml which controls some settings:
train:
  backend: kubeflow
  # we will be using a remote docker hub, we'll set this image name
  repository: idomic/general:kubeflow1
  # make sure our credentials are included when building the image
  include: [credentials.json]
Note
See how the repository is configured to the docker hub idomic/general
and the image within it kubeflow1 (: separated)
Build the Docker image (takes a few minutes the first time):
soopervisor export train
Once the export process finishes, you’ll see a new train/ folder with
three files: Dockerfile which is the file used to build the docker image,
a kubeflow_pipeline.py which is the pythonic version of the pipeline (you
can run it directly on a notebook instance within the cluster) and the file
ploomber_pipeline.yaml which contains the kubeflow pipeline to run.
To deploy, go to your cluster and upload the .yaml file as a new pipeline
(you can also use the CLI directly (we’ll cover both options).
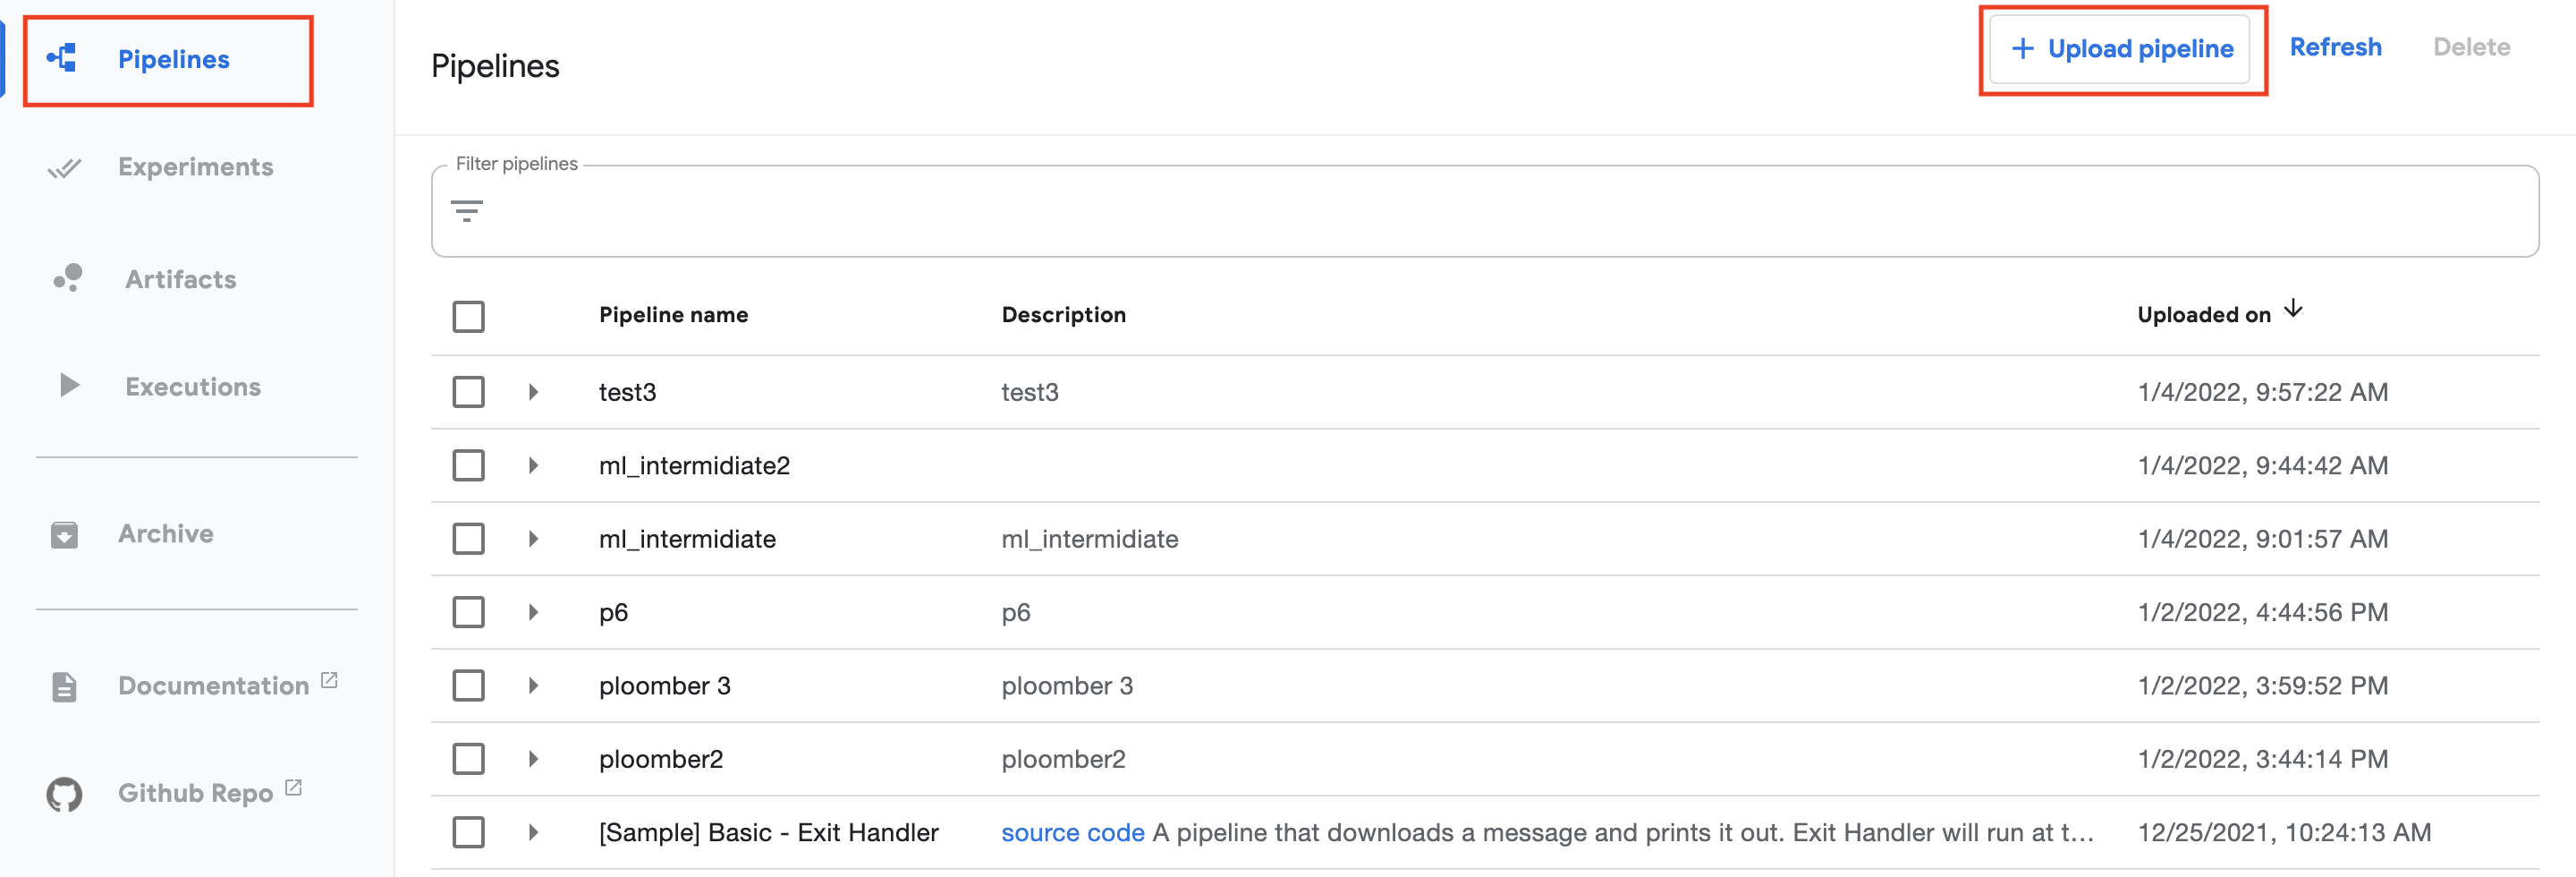
Option 1: UI upload of a Kubeflow pipeline#
Let’s go to the cluster and click on Pipelines (top left) and then on the
top right on + Upload pipeline. (see image below)
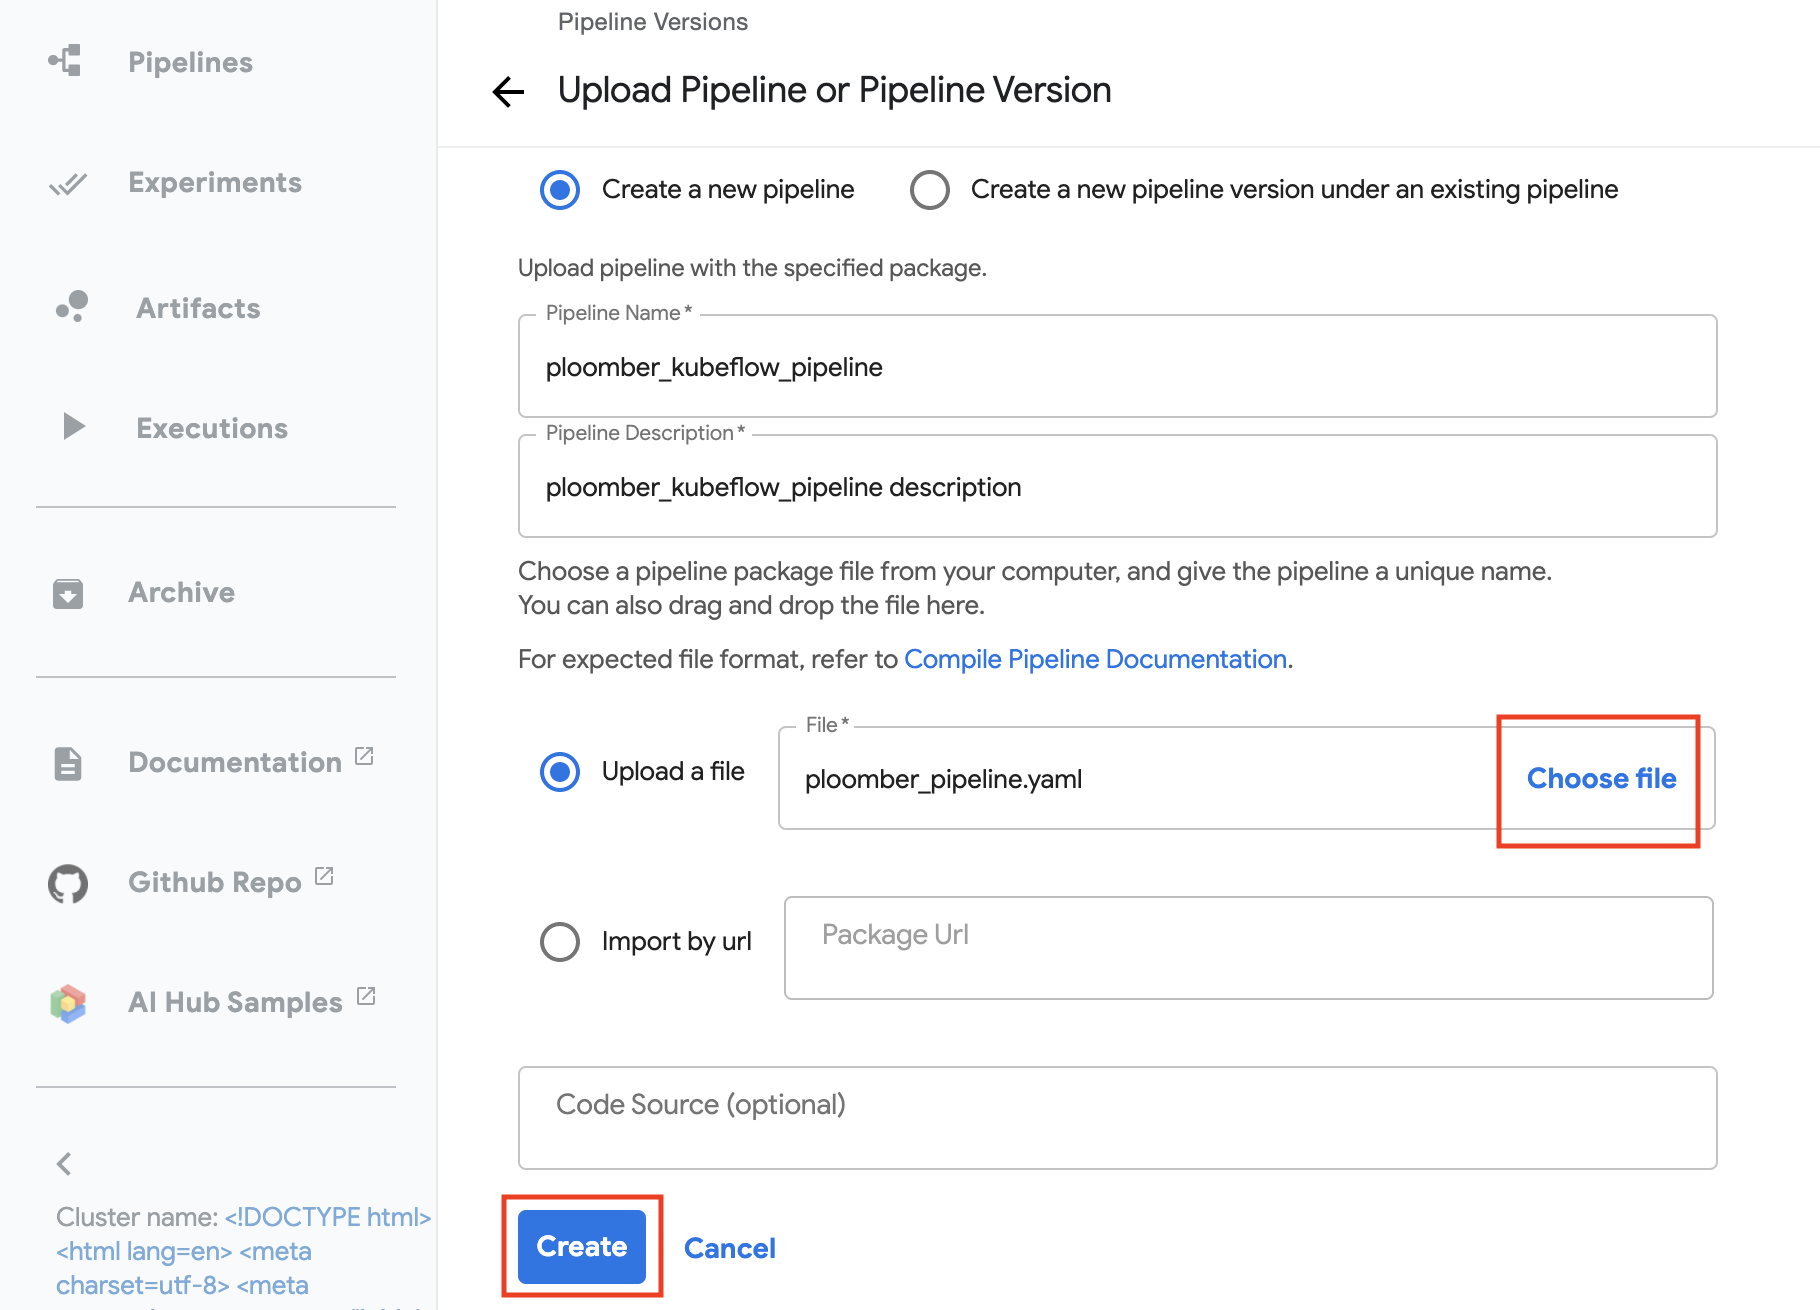
We now can name our pipeline
ml_intermidiate, describe it (or copy the name to it), click on upload file
and choose file, pick the ploomber_pipeline.yaml we just created. On the
bottom click on Create. (see image below)
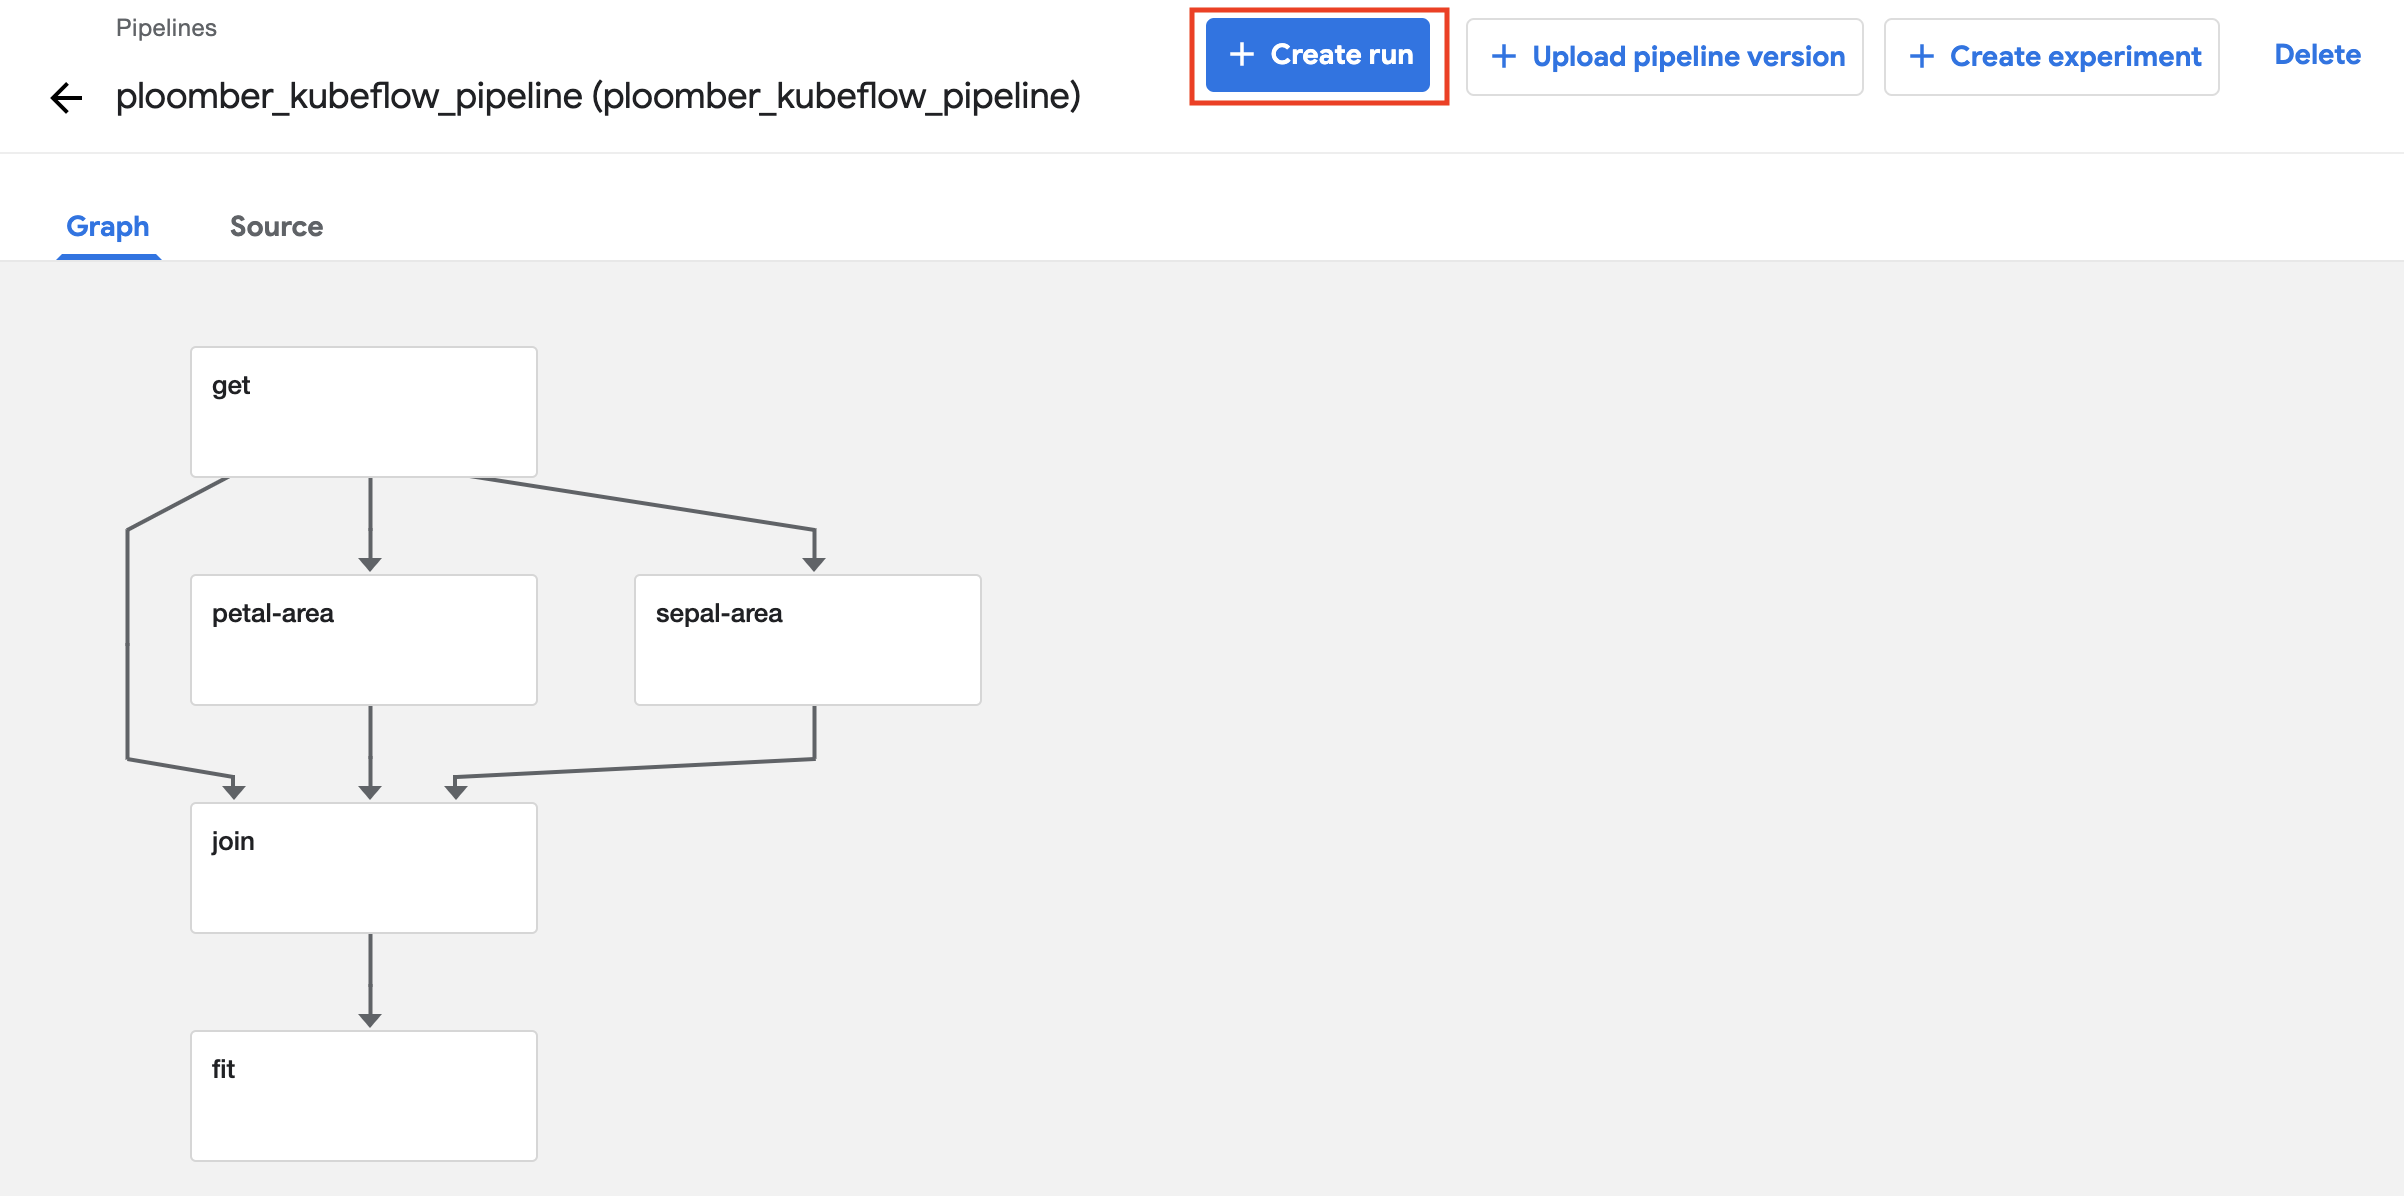
Now we can see that the pipeline is configured, we can see each step and the
dependencies, we’ll need to submit our first pipeline run. To do that, click on
+ Create run
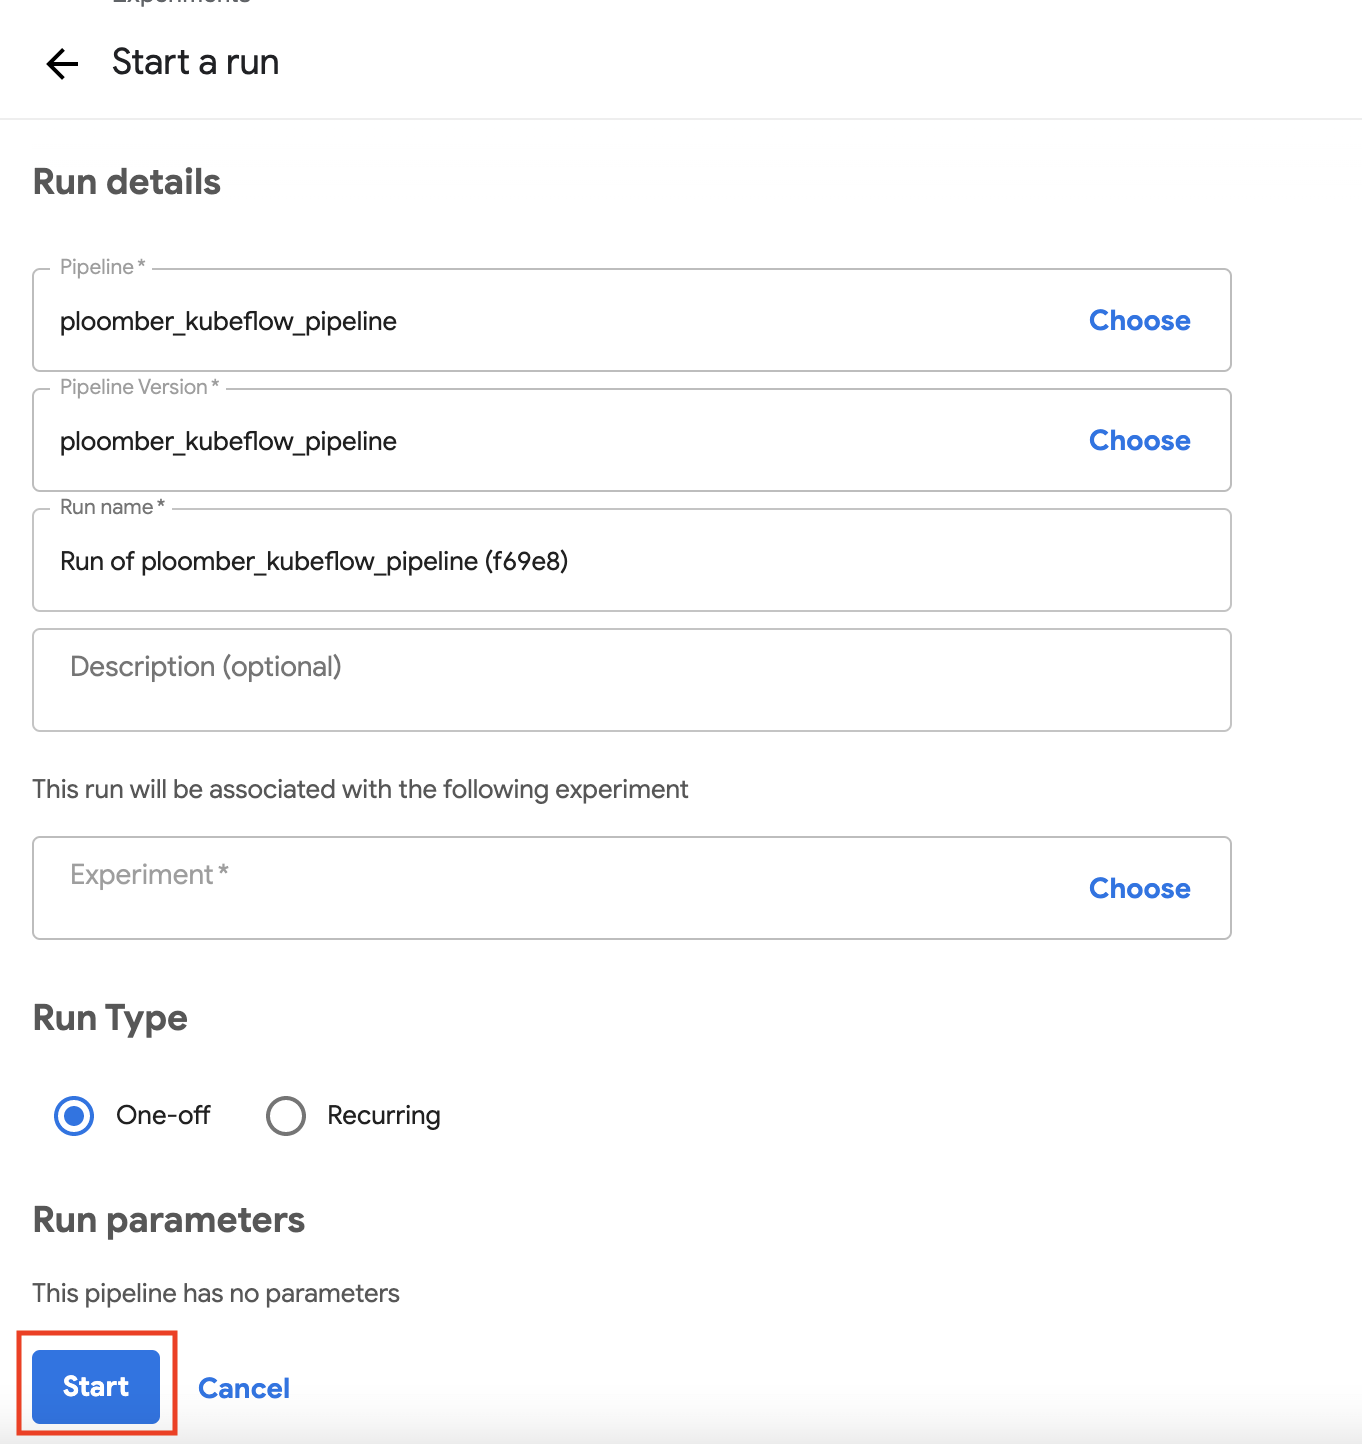
The run details should be filled automatically, if not give a
run name and the other missing details. On the bottom, click on Start.
Now you can watch the pipeline execution by clicking on the run you’ve created.
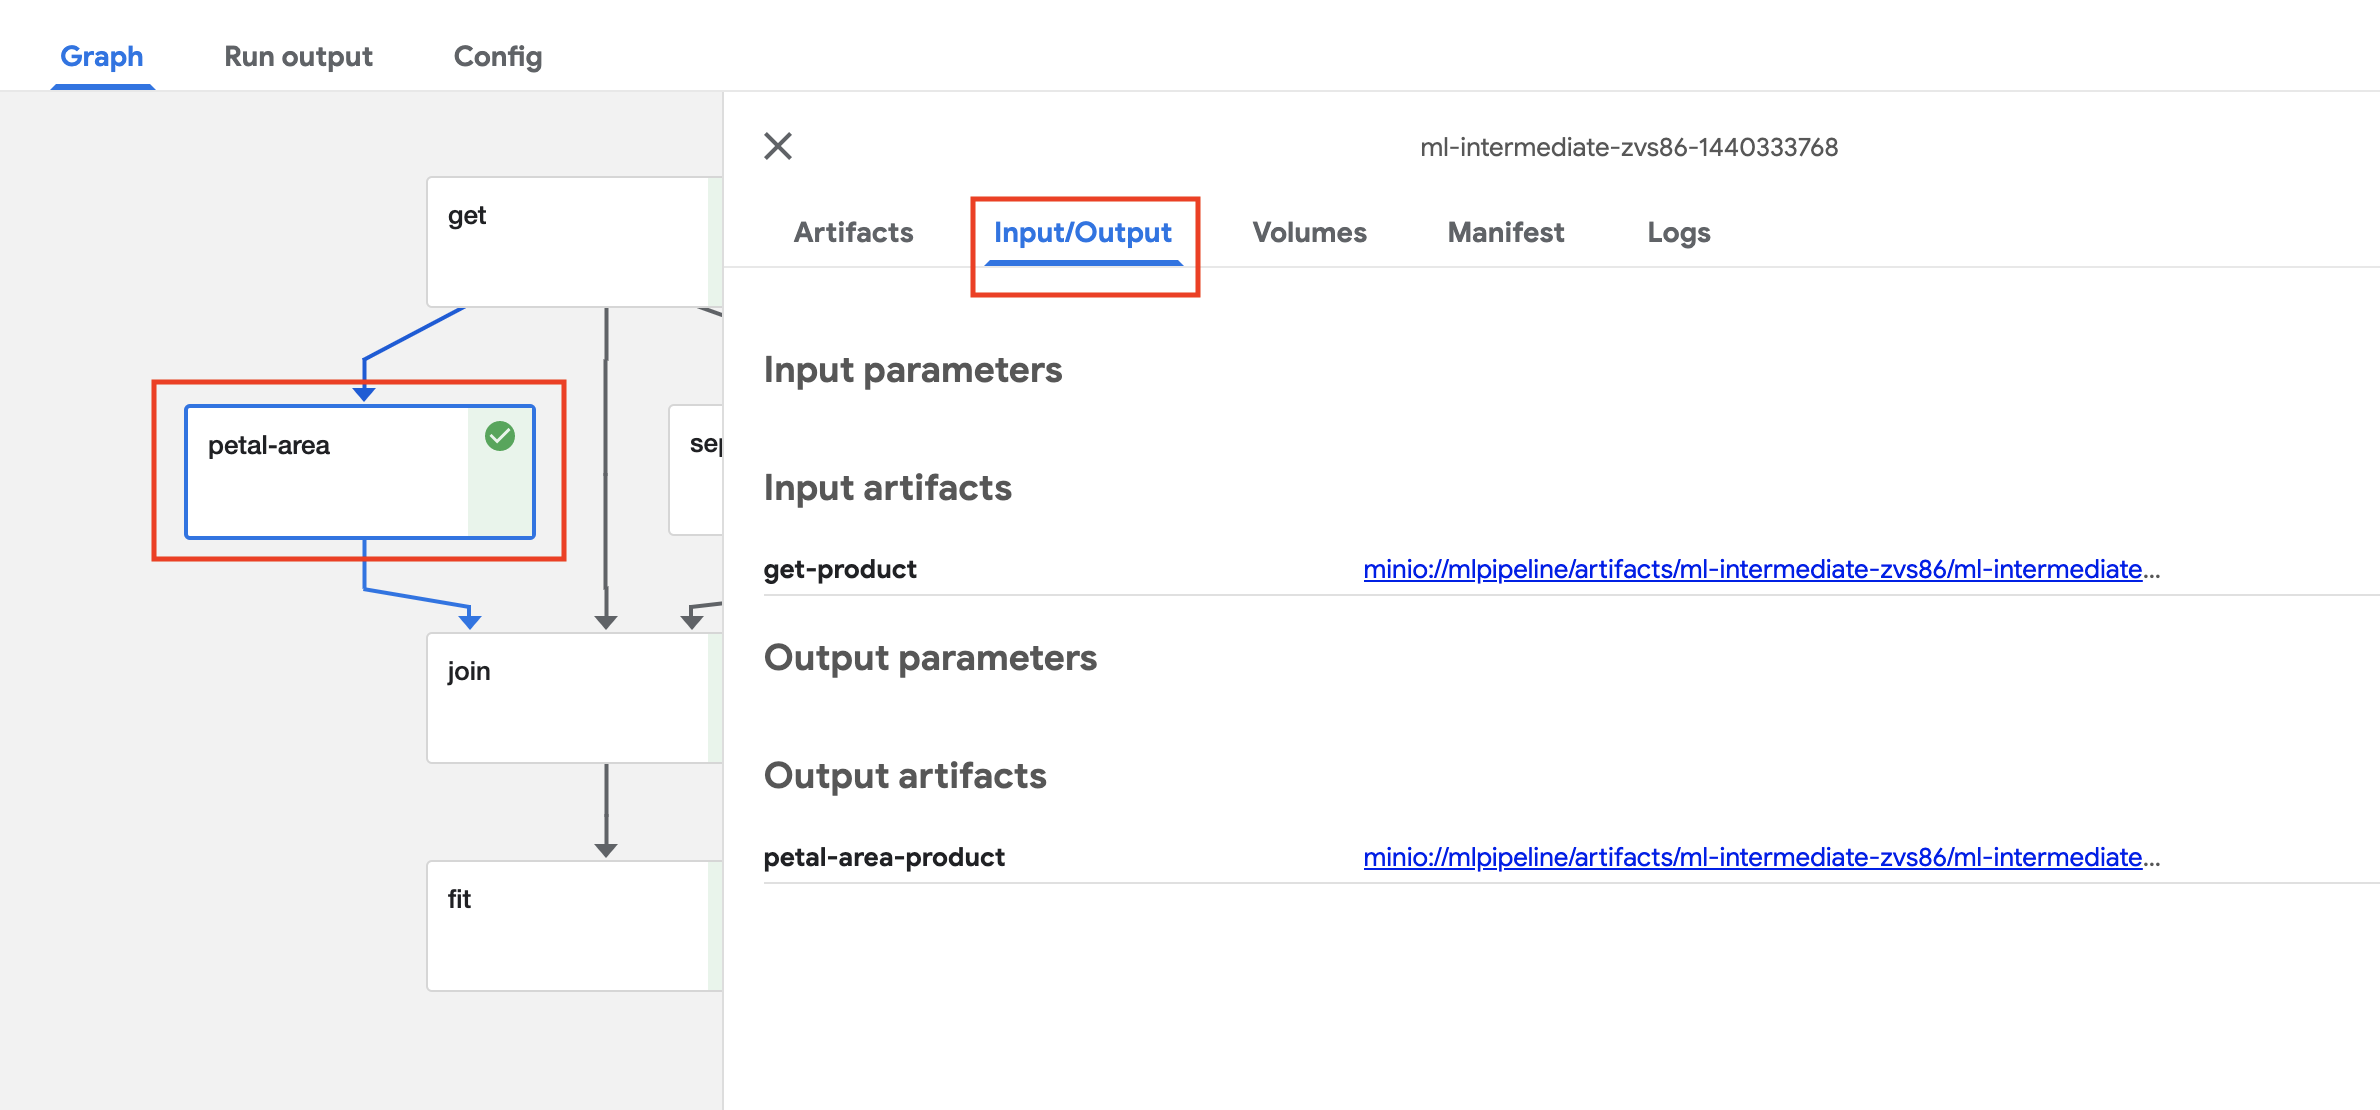
When the tasks are ready, you can view each task’s inputs and outputs, click on
the task, and then on the Input/Output tab. The links contain the raw files.
Option 2: CLI upload of a Kubeflow pipeline#
We need to make sure we have a working notebook on the cluster, we can open it
and upload/copy the content of the kubeflow_pipeline.py file. Make sure to
uncomment the client rows below (6, 7, 10, 135). We’ll also need to update the
kfp endpoint to your cluster and port. Once set we can run the notebook and
click on the run link below to get to the pipeline and its run details.
kfp_endpoint="YOUR_KFP_ENDPOINT"
client = kfp.Client(kfp_endpoint)

# This is a sanity check to make sure your notebook and cluster can communicate
print(client.list_experiments())from ploomber.clients import S3Client
client.create_run_from_pipeline_func(ml_intermediate, arguments={})