Soopervisor
Soopervisor runs Ploomber pipelines for batch processing (large-scale training or batch serving) or online inference.
pip install soopervisor
Watch our presentation at EuroPython 2021: Develop and Deploy a Machine Learning Pipeline in 30 Minutes With Ploomber.
Supported platforms
Batch serving and large-scale training:
Online inference:
From notebook to a production pipeline
We also have an example that shows how to use our ecosystem of tools to go from a monolithic notebook to a pipeline deployed in Kubernetes.
Standard layout
Soopervisor expects your Ploomber project to be in the standard project layout, which requires the following:
Dependencies file
requirements.lock.txt:pipdependencies file
Tip
You can generate it with pip freeze > requirements.lock.txt
OR
environment.lock.yml: conda environment with pinned dependencies
Tip
You can generate it with conda env export --no-build --file environment.lock.yml
Pipeline declaration
A pipeline.yaml file in the current working directory
(or in src/{package-name}/pipeline.yaml if your project is a Python
package).
Note
If your project is a package (i.e., it has a src/ directory, a
setup.py file is also required.
Scaffolding standard layout
The fastest way to get started is to scaffold a new project:
# install ploomber
pip install ploomber

# scaffold project
ploomber scaffold

# or to use conda (instead of pip)
ploomber scaffold --conda

# or to use the package structure
ploomber scaffold --package

# or to use conda and the package structure
ploomber scaffold --conda --package
Then, configure the development environment:
# move to your project's root folder
cd {project-name}

# configure dev environment
ploomber install
Note
ploomber install automatically generates the
environment.lock.yml or requirements.lock.txt file. If you prefer so,
you may skip ploomber install and create the lock files yourself.
Usage
Say that you want to train multiple models in a Kubernetes cluster, you may create a new target environment to execute your pipeline using Argo Workflows:
soopervisor add training --backend argo-workflows
After filling in some basic configuration settings, export the pipeline with:
soopervisor export training
Soopervisor will take care of packaging your code and submitting it for execution. Using Argo Workflows will create a Docker image, upload it to the configured registry, generate an Argo’s YAML spec, and submit the workflow.
Depending on the selected backend (Argo, Airflow, AWS Batch, or AWS Lambda),
configuration details will change, but the API remains the same:
soopervisor add, then soopervisor export.
Airflow
Important
This tutorial requires soopervisor 0.6.1 or higher
Note
This tutorial exports an Airflow DAG using the KubernetesPodOperator, to
use alternative Operators, see Airflow cookbook.
Got questions? Reach out to us on Slack.
This tutorial shows you how to export a Ploomber pipeline to Airflow.
If you encounter any issues with this tutorial, let us know.
Building Docker image
We provide a Docker image so you can quickly run this example:
# get repository
git clone https://github.com/ploomber/soopervisor
cd soopervisor/tutorials/airflow

# create a directory to store the pipeline output
export SHARED_DIR=$HOME/ploomber-airflow
mkdir -p $SHARED_DIR

# build image
docker build --tag ploomber-airflow .

# start
docker run -i -t -p 8080:8080 --privileged=true \
    -v /var/run/docker.sock:/var/run/docker.sock \
    --volume $SHARED_DIR:/mnt/shared-folder \
    --env SHARED_DIR \
    --env PLOOMBER_STATS_ENABLED=false \
    ploomber-airflow /bin/bash
Note
We need to run docker run in privileged mode since we’ll be running
docker commands inside the container.
More on that here
Create Kubernetes cluster
By default, the Airflow integration exports each task in your pipeline as a Airflow task using the KubernetesPodOperator, so we need to create a Kubernetes cluster to run the example:
The Docker image comes with k3d pre-installed; let’s create a cluster:
# create cluster
k3d cluster create mycluster --volume $SHARED_DIR:/host

# check cluster
kubectl get nodes
Get sample Ploomber pipeline
# get example
ploomber examples -n templates/ml-intermediate -o ml-intermediate
cd ml-intermediate

cp requirements.txt requirements.lock.txt
# configure development environment
pip install ploomber soopervisor
pip install -r requirements.txt
Configure target platform
# add a new target platform
soopervisor add training --backend airflow
Usually, you’d manually edit soopervisor.yaml to configure your
environment; for this example, let’s use one that we
already configured,
which tells soopervisor to mount a local directory to every pod so we can review results later:
cp ../soopervisor-airflow.yaml soopervisor.yaml
We must configure the project to store all outputs in the shared folder so we copy the pre-configured file:
cp ../env-airflow.yaml env.yaml
Submit pipeline
soopervisor export training --skip-tests --ignore-git

# import image to the cluster
k3d image import ml-intermediate:latest --cluster mycluster
Note
k3d image import is only required if creating the cluster with k3d.
Once the export process finishes, you’ll see a new training/ folder with
two files: ml-intermediate.py (Airflow DAG) and
ml-intermediate.json (DAG structure).
Customizing Airflow DAG
The .py file generated by soopervisor export contains the logic to
convert our pipeline into an Airflow DAG with basic defaults. However, we
can further customize it. In our case, we need some initialization
parameters in the generated KubernetesPodOperator tasks. Execute the
following command to replace the generated file with one that has the
appropriate settings:
cp ../ml-intermediate.py training/ml-intermediate.py
Submitting pipeline
To execute the pipeline, move the generated files to your AIRFLOW_HOME.
For this example, AIRFLOW_HOME is /root/airflow:
mkdir -p /root/airflow/dags
cp training/ml-intermediate.py ~/airflow/dags
cp training/ml-intermediate.json ~/airflow/dags

ls /root/airflow/dags
If everything is working, you should see the ml-intermediate DAG here:
airflow dags list
Let’s start the airflow UI and scheduler (this will take a few seconds):
bash /start_airflow.sh
Let’s unpause the DAG then trigger the run:
airflow dags unpause ml-intermediate
After unpausing, you should see the following message:
Dag: ml-intermediate, paused: False
If you don’t, likely, the Airflow scheduler isn’t ready yet, so wait for a few seconds and try again.
Trigger execution:
airflow dags trigger ml-intermediate
Congratulations! You just ran Ploomber on Airflow! 🎉
Note
If you encounter issues with Airflow, you can find the logs at
/airflow-scheduler.log and /airflow-webserver.log.
Monitoring execution status
You may track execution progress from Airflow’s UI by opening
http://localhost:8080 (Username: ploomber, Password: ploomber)
Alternatively, with the following command:
airflow dags state ml-intermediate {TIMESTAMP}
The TIMESTAMP shows after running airflow dags trigger ml-intermediate,
for example, once you execute the airflow dags trigger command, you’ll see
something like this in the console:
Created <DagRun ml-intermediate @ 2022-01-02T18:05:19+00:00: manual__2022-01-02T18:05:19+00:00, externally triggered: True>
Then, you can get the execution status with:
airflow dags state ml-intermediate 2022-01-02T18:05:19+00:00
Incremental builds
Try exporting the pipeline again:
soopervisor export training --skip-tests --ignore-git
You’ll see a message like this: Loaded DAG in 'incremental' mode has no tasks to submit.
Soopervisor checks the status of your pipeline and only schedules tasks that have changed
since the last run; since all your tasks are the same, there is nothing to run!
Let’s now modify one of the tasks and submit again:
# modify the fit.py task, add a print statement
echo -e "\nprint('Hello from Kubernetes')" >> fit.py

# re-build docker image
soopervisor export training --skip-tests --ignore-git

# import image
k3d image import ml-intermediate:latest --cluster mycluster

# copy files to the dags directory
cp training/ml-intermediate.py ~/airflow/dags
cp training/ml-intermediate.json ~/airflow/dags

# trigger execution
airflow dags trigger ml-intermediate
If you open the UI, you’ll see that this time, only the fit task ran because
that’s the only tasks whose source code change; we call this incremental
builds, and they’re a great feature for quickly running experiments in your
pipeline such as changing model hyperparameters or adding new pre-processing
methods; it saves a lot of time since you don’t have to execute the entire
pipeline every time.
Using other Operator
If you want to generate Airflow DAGs using other operators, check out the Airflow cookbook
AWS Batch
Important
This tutorial requires soopervisor 0.6.1 or higher
Note
Got questions? Reach out to us on Slack.
AWS Batch is a managed service for batch computing. This tutorial shows you how to submit a Ploomber pipeline to AWS Batch.
If you encounter any issues with this tutorial, let us know.
Click here to see a recorded demo.
Pre-requisites
soopervisor takes your pipeline, packages it, creates a Docker image,
uploads it, and submits it for execution; however, you still have to configure
the AWS Batch environment. Specifically, you must configure a computing
environment and a job queue. Refer to this guide for instructions.
Note
Only EC2 compute environments are supported.
Once you’ve configured an EC2 compute environment and a job queue, continue to the next step.
Setting up project
First, let’s install ploomber:
pip install ploomber
Fetch an example pipeline:
# get example
ploomber examples -n templates/ml-online -o ml-online
cd ml-online
Configure the development environment:
ploomber install
Then, activate the environment:
conda activate ml-online
Configure S3 client
We must configure a client to upload all generated artifacts to S3. To obtain such credentials, you may use the AWS console, ensure you give read and write S3 access. You may also create an S3 bucket or use one you already have.
Save a credentials.json file in the root directory (the folder that contains
the setup.py file) with your authentication keys:
{
    "aws_access_key_id": "YOUR-ACCESS-KEY-ID",
    "aws_secret_access_key": "YOU-SECRET-ACCESS-KEY"
}
Now, configure the pipeline to upload artifacts to S3. Modify the
pipeline.yaml file at ml-online/src/ml_online/pipeline.yaml so
it looks like this:
meta:
  source_loader:
  module: ml_online

  import_tasks_from: pipeline-features.yaml

# add this
clients:
    File: ml_online.clients.get_s3

# content continues...
Go to the src/ml_online/clients.py file and edit the get_s3 function,
modifying the bucket_name and parent parameters. The latter is the folder
inside the bucket to save pipeline artifacts. Ignore the
second function; it’s not relevant for this example.
To make sure your pipeline works, run:
ploomber status
You should see a table with a summary. If you see an error, check the traceback to see if it’s an authentication problem or something else.
Submitting a pipeline to AWS Batch
We are almost ready to submit. To execute tasks in AWS Batch, we must create a Docker image with all our project’s source code.
Create a new repository in Amazon ECR before continuing. Once you create it, authenticate with:
aws ecr get-login-password --region your-region | docker login --username AWS --password-stdin your-repository-url/name
Note
Replace your-repository-url/name with your repository’s URL and
your-region with the corresponding ECR region
Let’s now create the necessary files to export our Docker image:
# get soopervisor
pip install soopervisor

# register new environment
soopervisor add training --backend aws-batch
Open the soopervisor.yaml file and fill in the missing values in
repository, job_queue and region_name.
training:
  backend: aws-batch
  repository: your-repository-url/name
  job_queue: your-job-queue
  region_name: your-region-name
  container_properties:
  memory: 16384
  vcpus: 8
Submit for execution:
soopervisor export training --skip-tests --ignore-git
The previous command will take a few minutes since it has to build the Docker image from scratch. After that, subsequent runs will be much faster.
Note
if you successfully submitted tasks, but they are stuck in the console in
RUNNABLE status. It’s likely that the requested resources (the
container_properties section in soopervisor.yaml) exceeded the capacity
of the computing environment. Try lowering resources and submit again. If
that doesn’t work, check this out.
Tip
The number of concurrent jobs is limited by the resources in the Compute Environment. Increase them to run more tasks in parallel.
Congratulations! You just ran Ploomber on AWS Batch!
Kubernetes (Argo)
Note
Got questions? Reach out to us on Slack.
This tutorial shows how to run a pipeline in Kubernetes via Argo Workflows locally or in Google Cloud.
If you encounter any issues with this tutorial, let us know.
Click here to see the Argo Community Meeting talk.
We have two tutorials:
Local (only requires
docker)
Local example
Important
This tutorial requires soopervisor 0.6.1 or higher
This tutorial runs a pipeline in a local Kubernetes cluster using k3d.
Building Docker image
We provide a Docker image so you can quickly run this example:
# get repository
git clone https://github.com/ploomber/soopervisor
cd soopervisor/tutorials/kubernetes

# create a directory to store the pipeline output
export SHARED_DIR=$HOME/ploomber-k8s
mkdir -p $SHARED_DIR

# build image
docker build --tag ploomber-k8s .

# start
docker run -i -t \
    --privileged=true -v /var/run/docker.sock:/var/run/docker.sock \
    --volume $SHARED_DIR:/mnt/shared-folder \
    --env SHARED_DIR \
    --env PLOOMBER_STATS_ENABLED=false \
    -p 2746:2746 \
    ploomber-k8s /bin/bash
Note
We need to run docker run in privileged mode since we’ll be running
docker commands inside the container.
More on that here
Create Kubernetes cluster
The Docker image comes with k3d pre-installed; let’s create a cluster:
# create cluster
k3d cluster create mycluster --volume $SHARED_DIR:/host --port 2746:2746

# check cluster
kubectl get nodes
Note
If you see the error message
Bind for 0.0.0.0:2746 failed: port is already allocated, you may
drop the --port 2746:2746 and try again:
k3d cluster create mycluster --volume $SHARED_DIR:/host the command
will work but you’ll be unable to open Argo’s GUI.
Install Argo
We now install argo; note that we are using a custom installation file
(argo-pns.yaml) to ensure this works with k3d.
# install argo
kubectl create ns argo
kubectl apply -n argo -f argo-pns.yaml

# check argo pods (once they're all running, argo is ready)
kubectl get pods -n argo
Note
argo-pns.yaml is a custom file that changes the Argo executor to PNS;
this is required to ensure Argo works on k3d; however, this change
isn’t required in a production environment.
Tip
Optionally, submit sample Argo workflow to ensure everything is working:
argo submit -n argo --watch https://raw.githubusercontent.com/argoproj/argo-workflows/master/examples/hello-world.yaml
Get sample Ploomber pipeline
# get example
ploomber examples -n templates/ml-intermediate -o ml-intermediate
cd ml-intermediate

# configure development environment
cp requirements.txt requirements.lock.txt
pip install ploomber soopervisor
pip install -r requirements.txt
Configure target platform
Soopervisor allows you to configure the target platform using a
soopervisor.yaml file, let’s add it and set the backend to
argo-worflows:
soopervisor add training --backend argo-workflows
Usually, you’d manually edit soopervisor.yaml to configure your
environment; for this example, let’s use one that we
already configured,
which tells soopervisor to mount a local directory to every pod so we can review results later:
cp ../soopervisor-k8s.yaml soopervisor.yaml
We must configure the project to store all outputs in the shared folder, so we copy the pre-configured file:
cp ../env-k8s.yaml env.yaml
Submit pipeline
We finished configuring; let’s now submit the workflow:
# build docker image (takes a few minutes the first time) and generate an argo's yaml spec
soopervisor export training --skip-tests --ignore-git

# import image to the k8s cluster
k3d image import ml-intermediate:latest --cluster mycluster

# submit workflow
argo submit -n argo --watch training/argo.yaml
Congratulations! You just ran Ploomber on Kubernetes! 🎉
Note
k3d image import is only required if creating the cluster with k3d.
Once the execution finishes, take a look at the generated artifacts:
ls /mnt/shared-folder
Tip
You may also watch the progress from the UI.
# port forwarding to enable the UI
kubectl -n argo port-forward svc/argo-server 2746:2746
Then, open: https://127.0.0.1:2746
Incremental builds
Try exporting the pipeline again:
soopervisor export training --skip-tests --ignore-git
You’ll see a message like this: Loaded DAG in 'incremental' mode has no tasks to submit.
Soopervisor checks the status of your pipeline and only schedules tasks that have changed
since the last run; since all your tasks are the same, there is nothing to run!
Let’s now modify one of the tasks and submit it again:
# modify the fit.py task, add a print statement
echo -e "\nprint('Hello from Kubernetes')" >> fit.py

# re-build docker image and submit
soopervisor export training --skip-tests --ignore-git
k3d image import ml-intermediate:latest --cluster mycluster
argo submit -n argo --watch training/argo.yaml
You’ll see that this time, only the fit task ran because that’s the only
tasks whose source code change, we call this incremental builds, and they’re a
a great feature for quickly running experiments in your pipeline, such as changing
model hyperparameters or adding new pre-processing methods; it saves a lot of
time since you don’t have to execute the entire pipeline every time.
Google Cloud
Important
This tutorial requires soopervisor 0.6.1 or higher
This second tutorial runs a pipeline in a local Kubernetes cluster using Google Cloud.
Note
You may use or create a new Google Cloud project to follow this tutorial.
Pre-requisites
kubectlInstall Ploomber with
pip install ploomber
Instructions
Create a cluster and install Argo:
# create cluster
gcloud container clusters create my-cluster --num-nodes=1 --zone us-east1-b

# install argo
kubectl create ns argo
kubectl apply -n argo -f https://raw.githubusercontent.com/argoproj/argo-workflows/stable/manifests/quick-start-postgres.yaml

# create storage bucket (choose whatever name you want)
gsutil mb gs://YOUR-BUCKET-NAME
Submit a sample workflow to make sure Argo is working:
argo submit -n argo --watch https://raw.githubusercontent.com/argoproj/argo/master/examples/hello-world.yaml
Tip
Enable Argo’s UI:
# port forwarding to enable the UI
kubectl -n argo port-forward svc/argo-server 2746:2746
Then, open: https://127.0.0.1:2746
Install ploomber:
pip install ploomber
Let’s now run a Ploomber sample Machine Learning pipeline:
# get example
ploomber examples -n templates/ml-online -o ml-online
cd ml-online

# configure development environment
ploomber install

# activate environment
conda activate ml-online

# add a new target platform
soopervisor add training --backend argo-workflows
The previous command creates a soopervisor.yaml file where we can configure
the container registry to upload our Docker image:
training:
  backend: argo-workflows
  repository: gcr.io/PROJECT-ID/my-ploomber-pipeline
Replace PROJECT-ID with your actual project ID.
Each task will run in isolation, we must ensure that products generated by
a given task are available to its corresponding downstream tasks. Ww can use
Google Cloud Storage for that, add the following to the
src/ml_online/pipeline.yaml file:
# more content above...

serializer: ml_online.io.serialize
unserializer: ml_online.io.unserialize

# add these two lines
clients:
  File: ml_online.clients.get_gcloud

# content continues...
The previous change tells Ploomber to call the function get_gcloud defined
in module src/ml_online/clients.py to get the client. Edit the
clients.py to add your bucket name:
from ploomber.clients import GCloudStorageClient

def get_gcloud():
    # edit YOUR-BUCKET-NAME
    return GCloudStorageClient(bucket_name='YOUR-BUCKET-NAME',
                               parent='ml-online',
                               json_credentials_path='credentials.json')
You can ignore the rest of the file. Finally, we add service account credentials to upload to Google Cloud Storage. To learn more about service accounts, click here.
Store the service account details in a credentials.json in the root project
directory (same folder as setup.py):
We are ready to execute the workflow:
# authenticate to push docker image
gcloud auth configure-docker

# packages code, create docker image and upload it (takes a few mins)
soopervisor export training

# submit workflow
argo submit -n argo training/argo.yaml
You may keep track of execution by opening the UI. Check out the bucket to see output.
Congratulations! You just ran Ploomber on Kubernetes!
Attention
Make sure you delete your cluster, bucket, and image after running this example!
# delete cluster
gcloud container clusters delete my-cluster --zone us-east1-b

# delete bucket
gsutil rm -r gs://my-sample-ploomber-bucket

# delete image (you can get the image id from the google cloud console)
gcloud container images delete IMAGE-ID
Kubeflow
Important
The kubeflow integration requires soopervvisor>=0.7
Important
The Kubeflow tutorial is in beta! Got questions or found issues? Reach out to us on Slack.
This tutorial shows you how to export a Ploomber pipeline to Kubeflow.
If you encounter any issues with this tutorial, let us know.
Note
This tutorial uses cloud storage (S3 or Google Cloud Storage). In addition, it runs on the local cluster local storage for faster data fetch.
Pre-requisites
condaSee instructions hereInstall Ploomber with
pip install ploomber
Note
When installing Kubeflow, you must use a strong enough VM to meet the
basic requirements. This tutorial assumes the Kubeflow is configured and
you’re running within this cluster. Another option is to run the tutorial
locally and upload the final ploomber_pipeline.yaml to Kubeflow.
Instructions
First, let’s install ploomber:
pip install ploomber
Let’s now pull some sample code:
# get example
ploomber examples -n templates/ml-intermediate -o ml-intermediate
cd ml-intermediate
Since each task executes in a different Docker container, we have to configure
cloud storage for tasks to share data. Modify the environment.yml file and
add the appropriate dependency:
# content...
- pip:
  # dependencies...

  # add your dependency here
  - boto3 # if you want to use S3
  - google-cloud-storage # if you want to use Google Cloud Storage
We also need to configure the pipeline to use cloud storage, open
the pipeline.yaml file, and add the following next to the meta section.
meta:
    # some content...

clients:
    File: clients.get_s3
meta:
    # some content...

clients:
    File: clients.get_gcloud
Now, edit the clients.py file, you only need to change the bucket_name
parameter for the corresponding function. For example, if using a bucket with
the name bucket-name and S3, clients.py should look like this:
from ploomber.clients import S3Client

def get_s3():
    return S3Client(bucket_name='bucket-name',
                    parent='ml-intermediate',
                    json_credentials_path='credentials.json')
from ploomber.clients import GCloudStorageClient

def get_gcloud():
    return GCloudStorageClient(bucket_name='bucket-name',
                               parent='ml-online',
                               json_credentials_path='credentials.json')
To authenticate to the cloud storage service, add a credentials.json
file in the project root (the same folder that has the environment.yml
file.
{
    "aws_access_key_id": "YOUR-ACCESS-KEY-ID",
    "aws_secret_access_key": "YOU-SECRET-ACCESS-KEY"
}
{
    "type": "service_account",
    "project_id": "project-id",
    "private_key_id": "private-key-id",
    "private_key": "private-key",
    "client_email": "client-email",
    "client_id": "client-id",
    "auth_uri": "https://accounts.google.com/o/oauth2/auth",
    "token_uri": "https://oauth2.googleapis.com/token",
    "auth_provider_x509_cert_url": "https://www.googleapis.com/oauth2/v1/certs",
    "client_x509_cert_url": "https://www.googleapis.com/robot/v1/metadata/x509/service-account.iam.gserviceaccount.com"
}
Note
When running with local storage, Kubeflow takes the product path and name
and stores it accordingly to its temporary outputs folder. You will need
to set the path of the products in the pipeline.yaml (the file that
defines the pipeline - above) to:
product: '{{root}}/product/data/get.parquet' note how the product
name appears in the path (mandatory). In addition we can see below that for
the nb and model products we set the path according to their names.
This is how your pipeline.yaml file should look like if you’re using GCP:
meta:
  jupyter_functions_as_notebooks: True
  import_tasks_from: partial.features.yaml

clients:
  File: clients.get_gcloud

tasks:
  - source: tasks.get.fn
    name: get
    product: '{{root}}/product/data/get.parquet'
    params:
      sample: '{{sample}}'

  - source: fit.py
    name: fit
    product:
        nb: '{{root}}/nb/data/nb.html'
        model: '{{root}}/model/data/model.pickle'
Important
Make sure to adjust those files to have the same output structure:
partial.features.yaml and pipeline.serve.yaml.
In addition, we also need to configure the env files to the right root location.
Make sure in these files env.local.yaml, env.serve.yaml and env.yaml
the root is set to 'outputs' in a similar fashion to the env.yaml below:
root: 'outputs'
sample: False
Let’s now create the virtual environment:
# configure environment
conda env create --file environment.yml

# activate environment
conda activate ml-intermediate

# generate lock file
conda env export --no-build --file environment.lock.yml
Let’s now verify that everything is configured correctly:
ploomber status
We now export the pipeline to Kubeflow:
soopervisor add train --backend kubeflow
Note
You don’t have to install soopervisor manually; it should’ve been
installed when running ploomber install. If missing, install it with
pip install soopervisor.
soopervisor add creates a few new files. Let’s configure
soopervisor.yaml which controls some settings:
train:
  backend: kubeflow
  # we will be using a remote docker hub, we'll set this image name
  repository: idomic/general:kubeflow1
  # make sure our credentials are included when building the image
  include: [credentials.json]
Note
See how the repository is configured to the docker hub idomic/general
and the image within it kubeflow1 (: separated)
Build the Docker image (takes a few minutes the first time):
soopervisor export train
Once the export process finishes, you’ll see a new train/ folder with
three files: Dockerfile which is the file used to build the docker image,
a kubeflow_pipeline.py which is the pythonic version of the pipeline (you
can run it directly on a notebook instance within the cluster) and the file
ploomber_pipeline.yaml which contains the kubeflow pipeline to run.
To deploy, go to your cluster and upload the .yaml file as a new pipeline
(you can also use the CLI directly (we’ll cover both options).
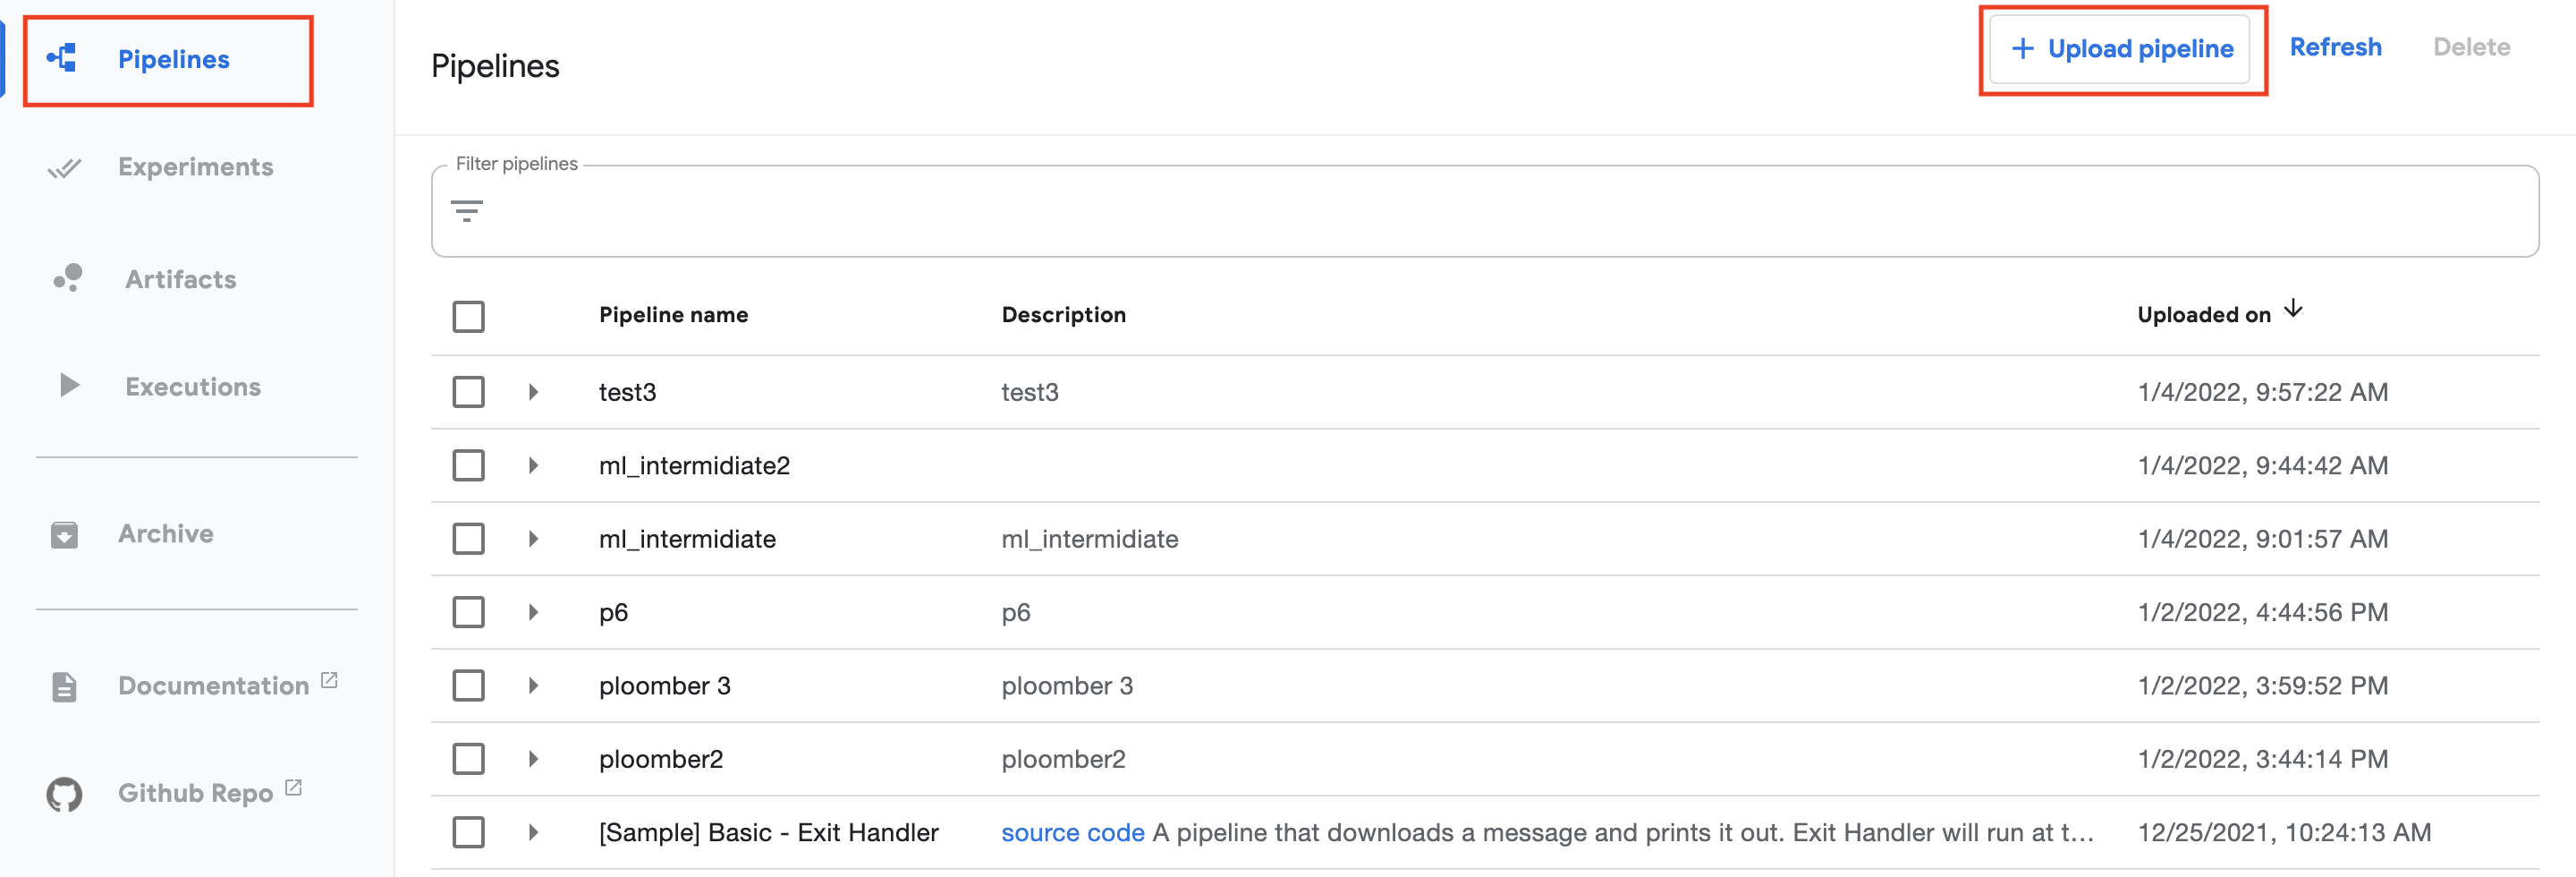
Option 1: UI upload of a Kubeflow pipeline
Let’s go to the cluster and click on Pipelines (top left) and then on the
top right on + Upload pipeline. (see image below)
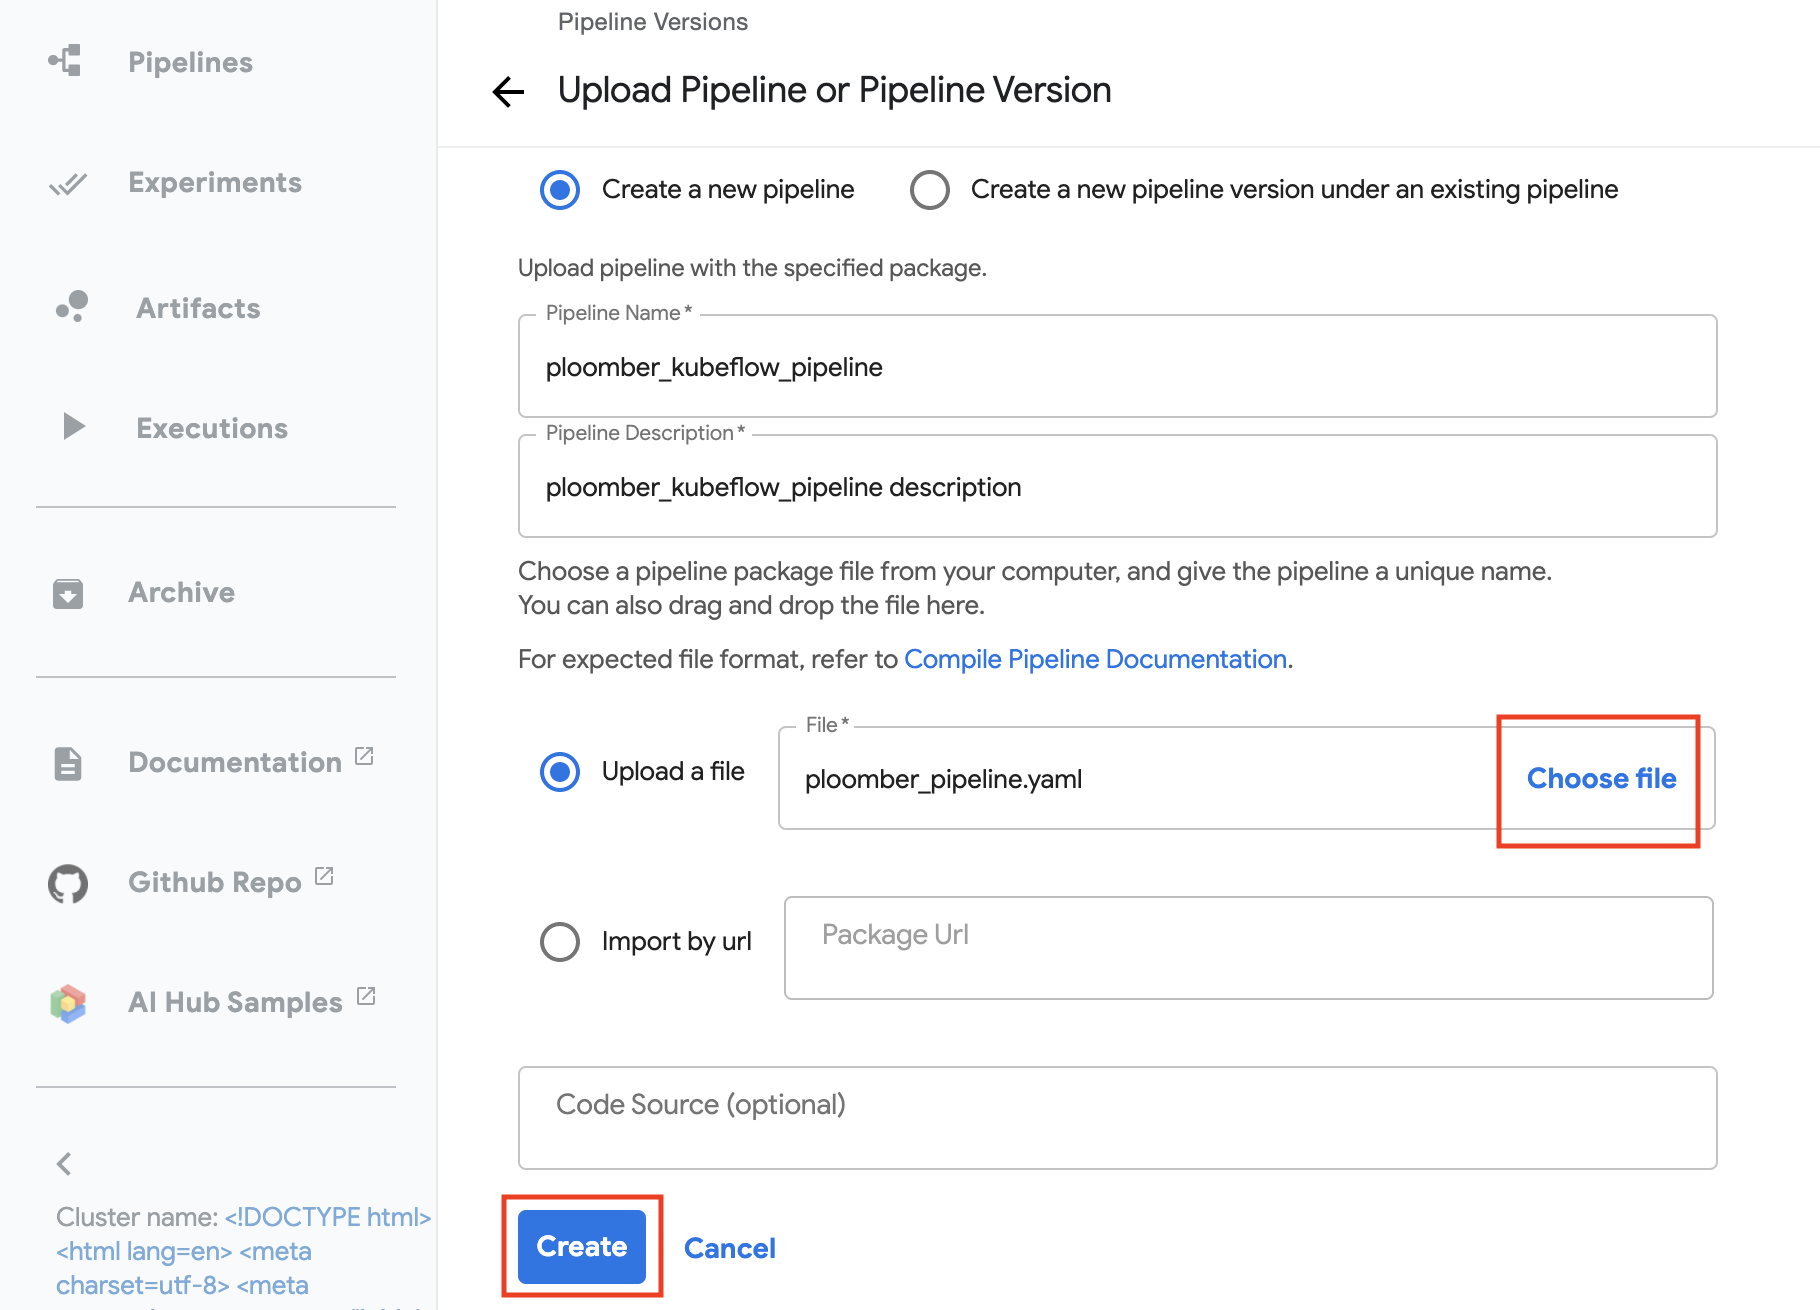
We now can name our pipeline
ml_intermidiate, describe it (or copy the name to it), click on upload file
and choose file, pick the ploomber_pipeline.yaml we just created. On the
bottom click on Create. (see image below)
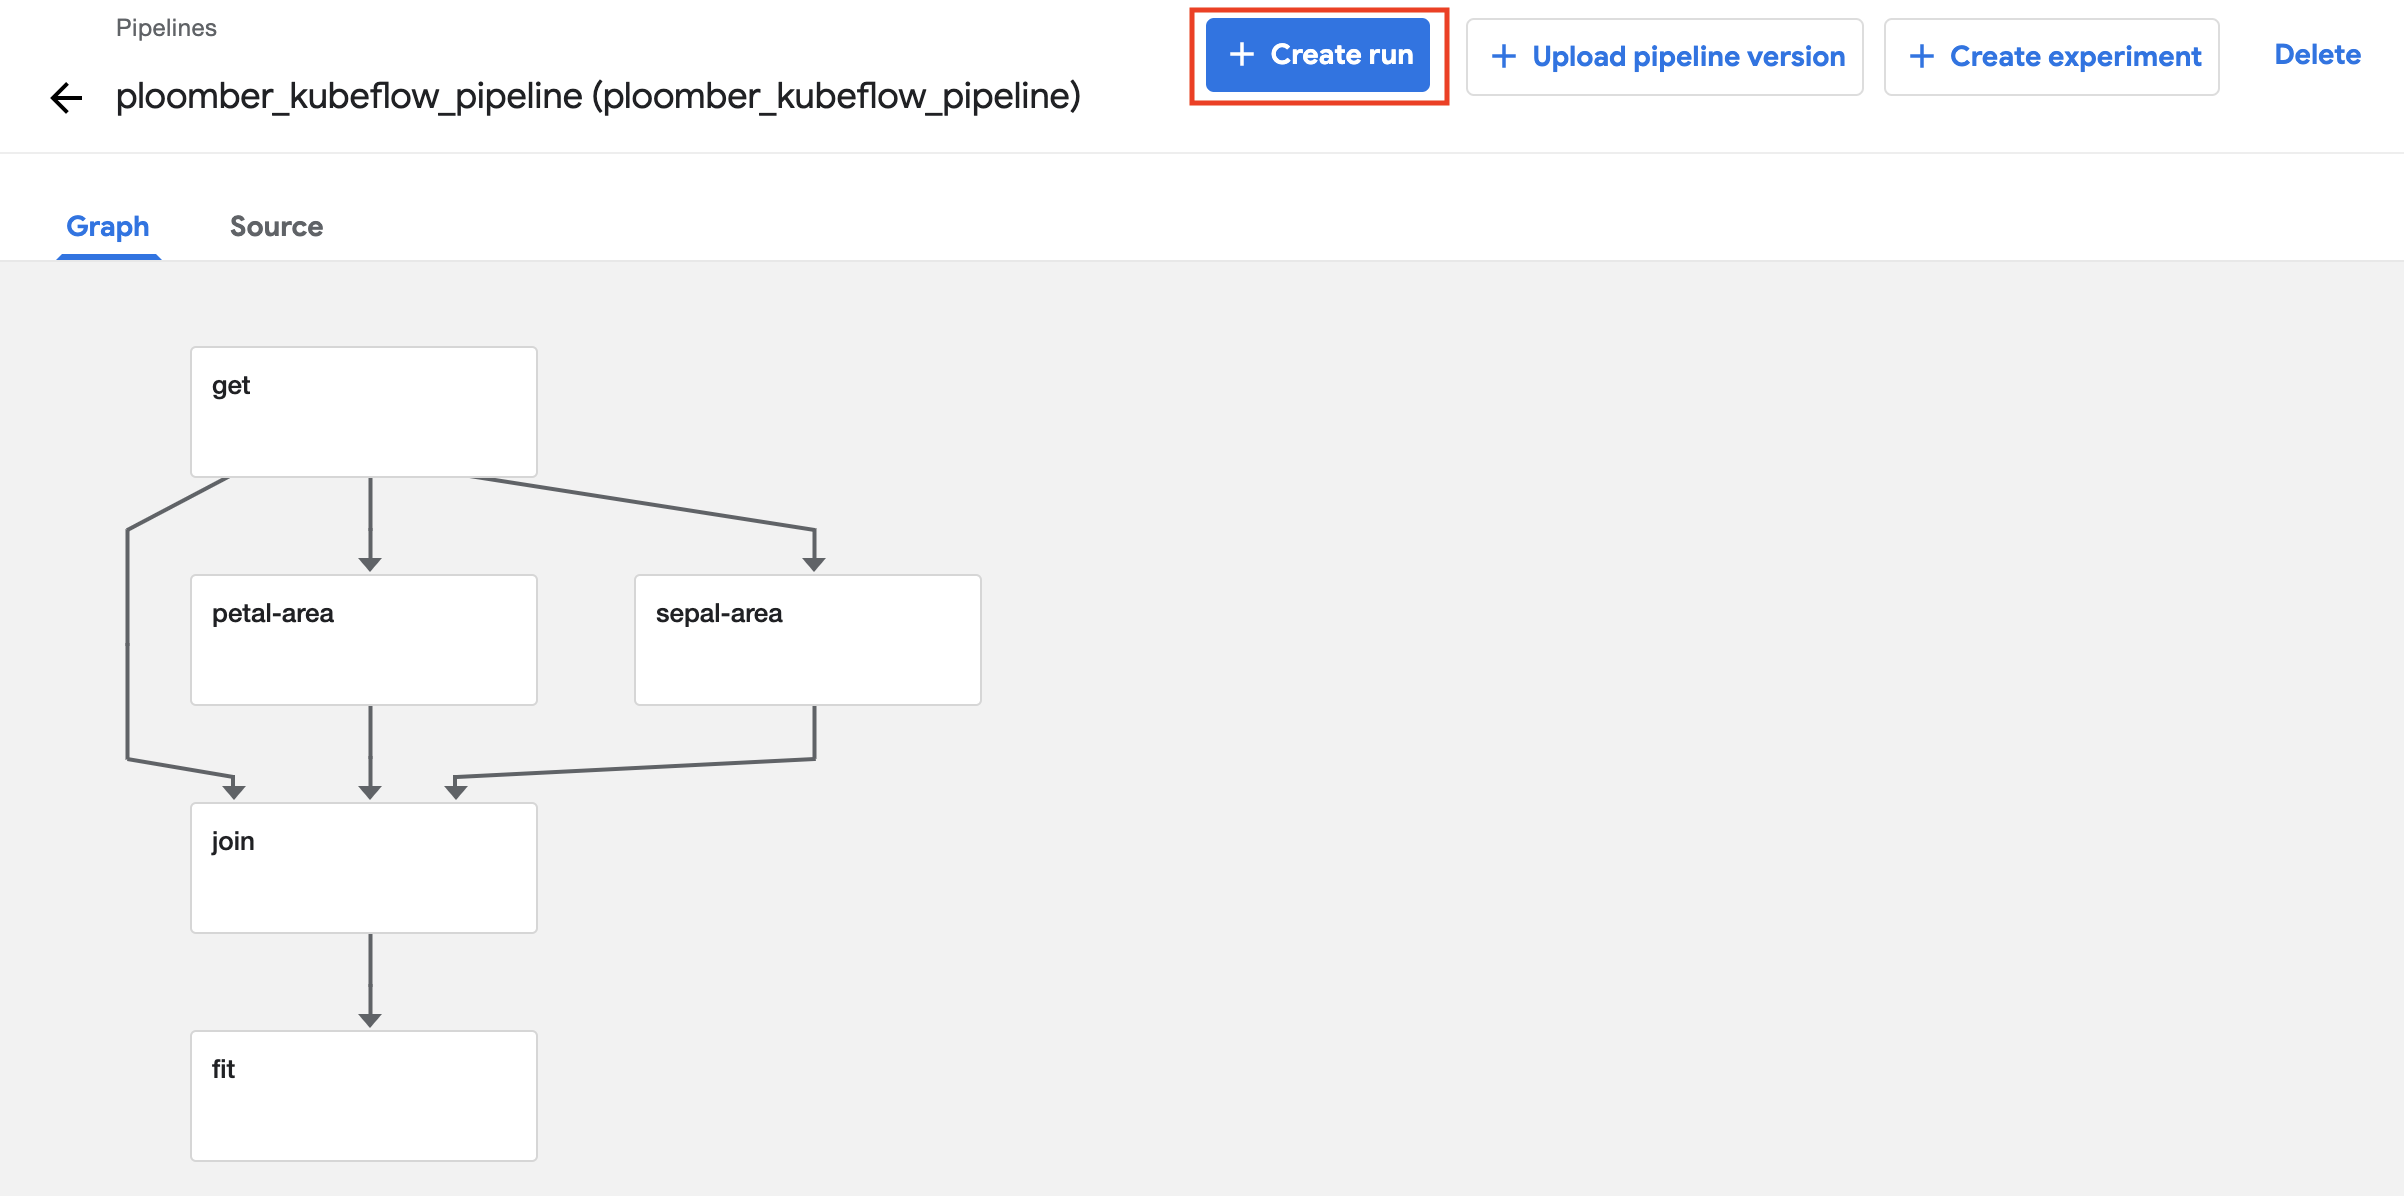
Now we can see that the pipeline is configured, we can see each step and the
dependencies, we’ll need to submit our first pipeline run. To do that, click on
+ Create run
The run details should be filled automatically, if not give a
run name and the other missing details. On the bottom, click on Start.
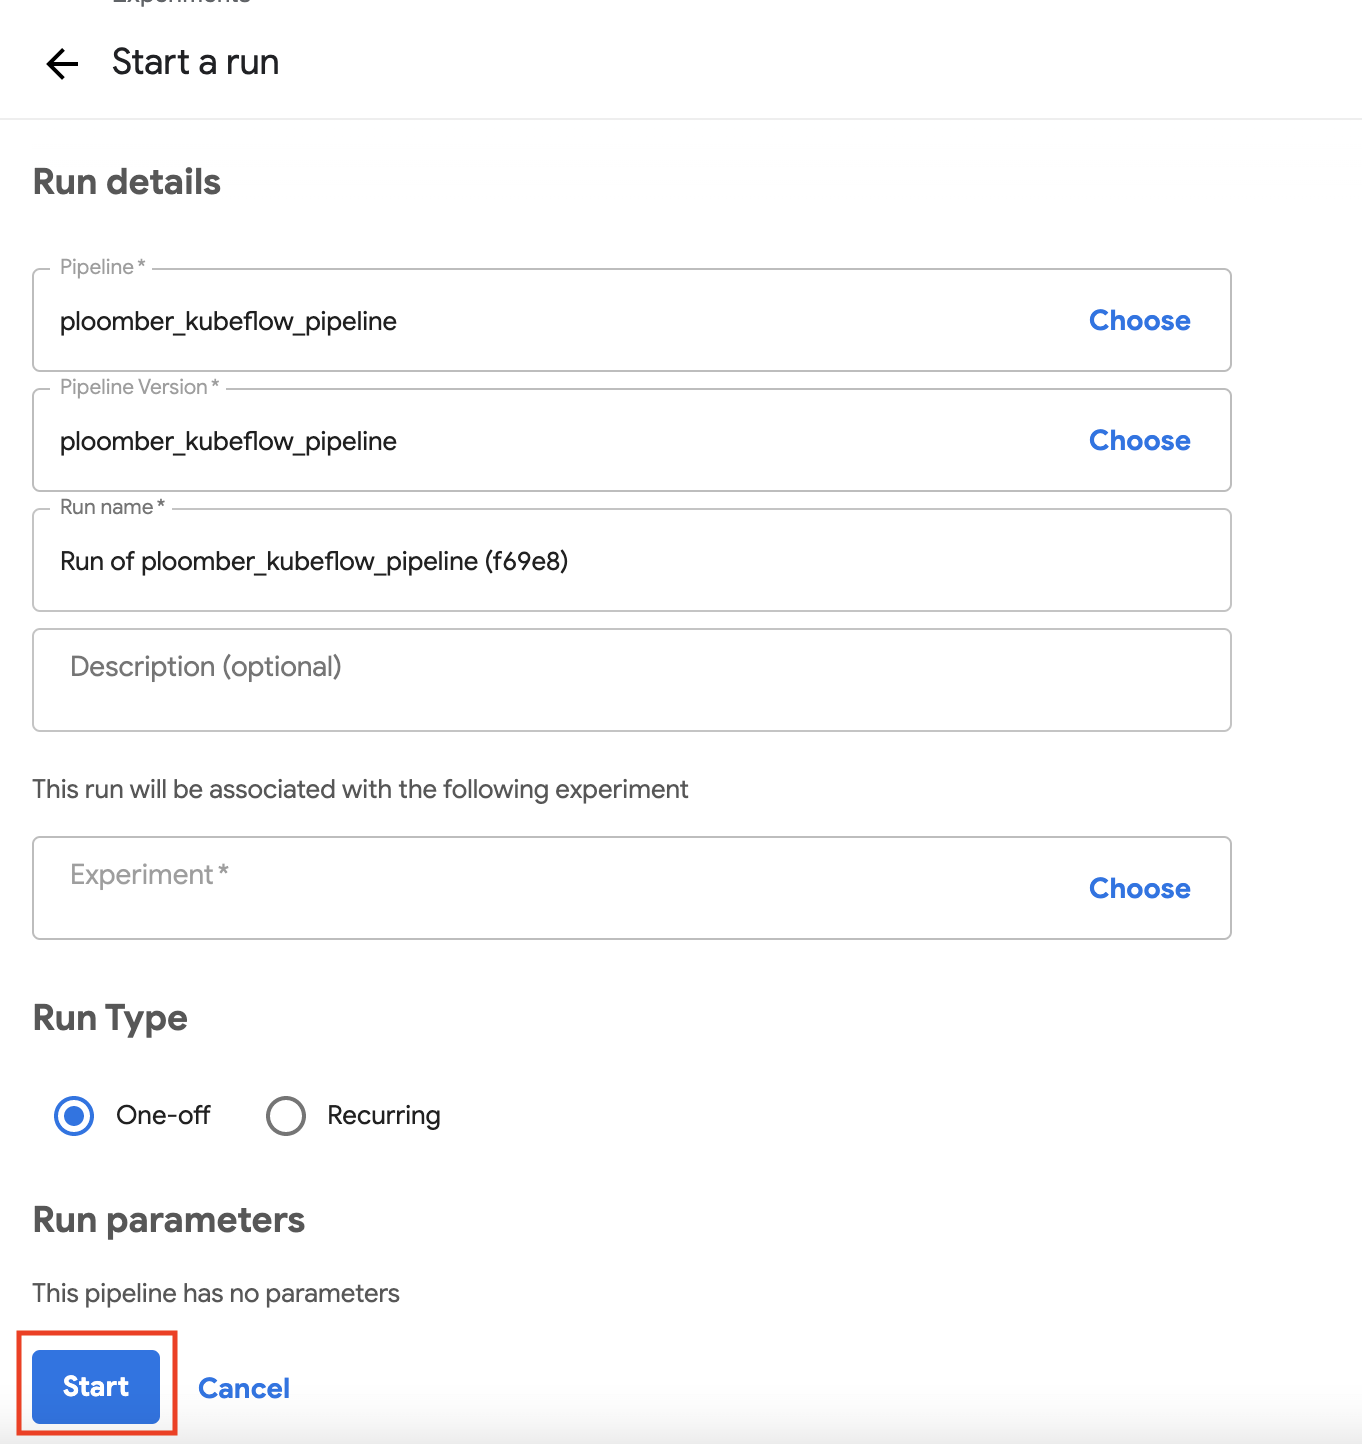
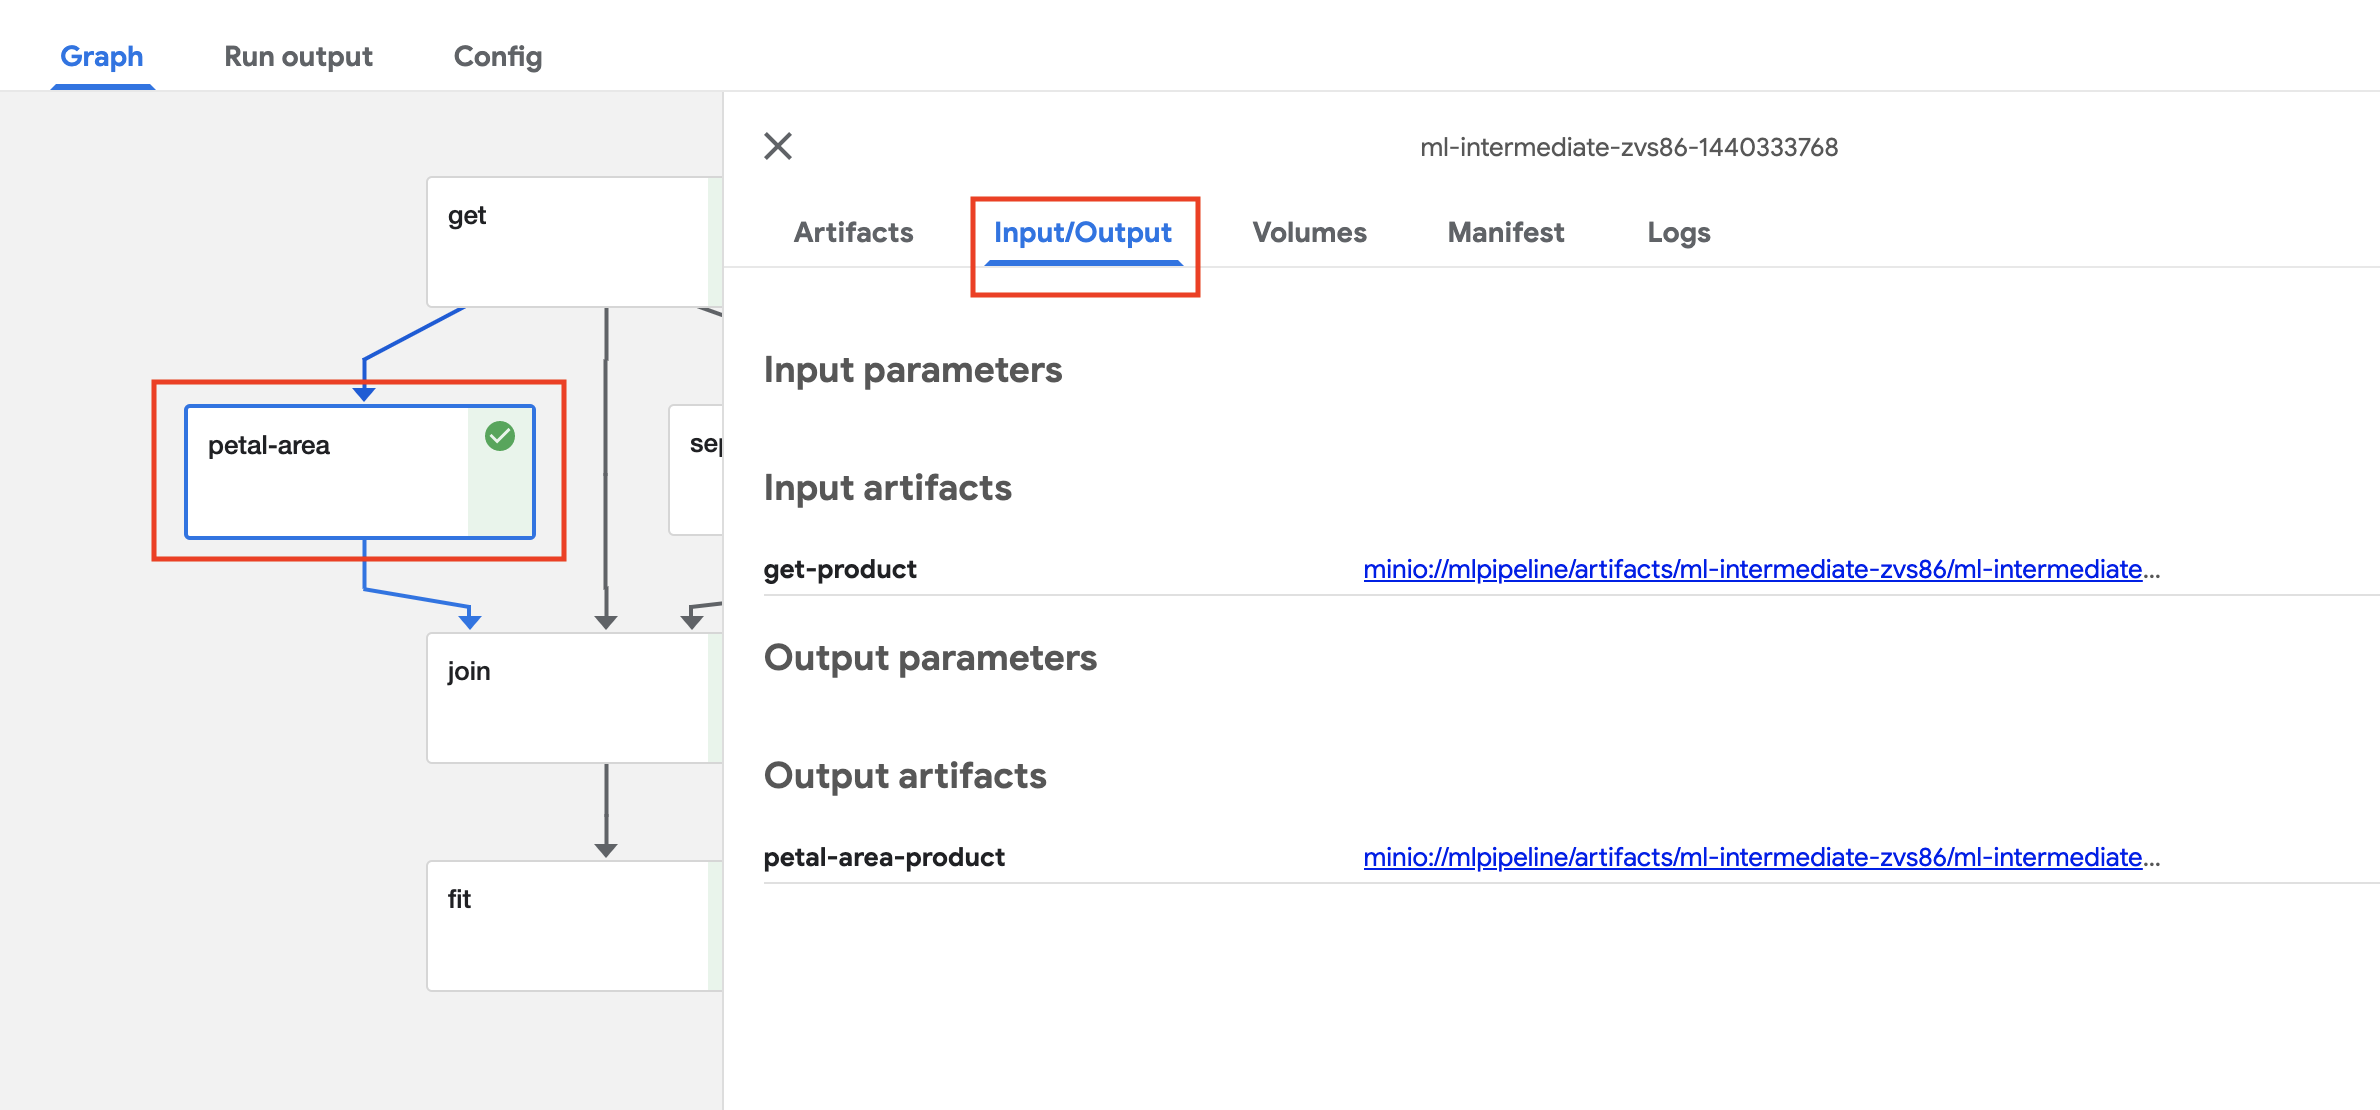
Now you can watch the pipeline execution by clicking on the run you’ve created.
When the tasks are ready, you can view each task’s inputs and outputs, click on
the task, and then on the Input/Output tab. The links contain the raw files.
Option 2: CLI upload of a Kubeflow pipeline
We need to make sure we have a working notebook on the cluster, we can open it
and upload/copy the content of the kubeflow_pipeline.py file. Make sure to
uncomment the client rows below (6, 7, 10, 135). We’ll also need to update the
kfp endpoint to your cluster and port. Once set we can run the notebook and
click on the run link below to get to the pipeline and its run details.
kfp_endpoint="YOUR_KFP_ENDPOINT"
client = kfp.Client(kfp_endpoint)

# This is a sanity check to make sure your notebook and cluster can communicate
print(client.list_experiments())from ploomber.clients import S3Client
client.create_run_from_pipeline_func(ml_intermediate, arguments={})
Slurm
Tip
Got questions? Reach out to us on Slack.
This tutorial shows you how to export a Ploomber pipeline to SLURM.
If you encounter any issues with this tutorial, let us know.
Pre-requisites
Important
This integration requires ploomber 0.13.7 or higher and soopervisor 0.6
or higher (To upgrade: pip install ploomber soopervisor --upgrade)
Setting up the project
Note
These instructions are based on this article.
First, let’s create a SLURM cluster for testing. Create the following docker-compose.yml file:
services:
  slurmjupyter:
        image: rancavil/slurm-jupyter:19.05.5-1
        hostname: slurmjupyter
        user: admin
        volumes:
                - shared-vol:/home/admin
        ports:
                - 8888:8888
  slurmmaster:
        image: rancavil/slurm-master:19.05.5-1
        hostname: slurmmaster
        user: admin
        volumes:
                - shared-vol:/home/admin
        ports:
                - 6817:6817
                - 6818:6818
                - 6819:6819
  slurmnode1:
        image: rancavil/slurm-node:19.05.5-1
        hostname: slurmnode1
        user: admin
        volumes:
                - shared-vol:/home/admin
        environment:
                - SLURM_NODENAME=slurmnode1
        links:
                - slurmmaster
  slurmnode2:
        image: rancavil/slurm-node:19.05.5-1
        hostname: slurmnode2
        user: admin
        volumes:
                - shared-vol:/home/admin
        environment:
                - SLURM_NODENAME=slurmnode2
        links:
                - slurmmaster
  slurmnode3:
        image: rancavil/slurm-node:19.05.5-1
        hostname: slurmnode3
        user: admin
        volumes:
                - shared-vol:/home/admin
        environment:
                - SLURM_NODENAME=slurmnode3
        links:
                - slurmmaster
volumes:
        shared-vol:
Now, start the cluster:
docker-compose up -d
Important
Ensure you’re running a recent version of docker-compose, older
versions may throw an error like this:
Unsupported config option for volumes: 'shared-vol'
Unsupported config option for services: 'slurmmaster'
Tip
Once the cluster is up, go http://localhost:8888 to open JupyterLab, where you can edit files, open terminals, and monitor Slurm jobs (Click on Slurm Queue under HPC Tools in the Launcher menu) from your browser.
Let’s connect to the cluster to submit the jobs:
docker-compose exec slurmjupyter /bin/bash
Configure the environment:
# Install miniconda (to get a Python environment ready, not needed if
# There's already a Python environment up and running)
wget https://repo.anaconda.com/miniconda/Miniconda3-latest-Linux-x86_64.sh
bash ~/Miniconda3-latest-Linux-x86_64.sh -b -p $HOME/miniconda

# Init conda
eval "$($HOME/miniconda/bin/conda shell.bash hook)"

# Create and activate env
conda env create --name myenv
conda activate myenv

# install ploomber and soopervisor in the base environment
pip install ploomber soopervisor

# Download sample pipeline to example/
ploomber examples -n templates/ml-basic -o example
cd example

# Install project dependencies
pip install -r requirements.txt

# Register a soopervisor environment with the SLURM backend
soopervisor add cluster --backend slurm
The soopervisor add creates a cluster/ directory with a
template.sh file, this is a template that Soopervisor uses to submit
the tasks in your pipeline. If should contain the placeholders
{{name}}, and {{command}}, which Soopervisor will replace by the
task name and the command to execute such a task, respectively. You can
customize it to suit your needs.
For example, since we want the tasks to run in the conda environment
we created, edit the template.sh so it looks like this:
#!/bin/bash
#SBATCH --job-name={{name}}
#SBATCH --output=result.out
#

# Activate myenv
conda activate myenv
srun {{command}}
We can now submit the tasks:
soopervisor export cluster
Once jobs finish execution, you’ll see the outputs in the output directory.
Tip
If you execute soopervisor export cluster, only tasks whose source code
has changed will be executed again, to force the execution of all tasks, run
soopervisor export cluster --mode force
Note
When scheduling jobs, soopervisor calls the sbatch command and
passes the --kill-on-invalid-dep=yes, this causes tasks to abort if
any of its dependencies fails. For example, if you have a load -> clean
pipeline and load fails, clean is aborted.
Important
For Ploomber to determine which tasks to schedule, it needs to parse your
pipeline and check each task’s status. If your pipeline has functions
as tasks, the Python environment where you execute soopervisor export
must have all dependencies required to import those functions. e.g., if a
function train_model uses sklearn, then sklearn must be
installed. If your pipeline only contains scripts/notebooks, this is not
required.
Stop the cluster:
docker-compose stop
Full workflow
Important
This tutorial requires soopervisor 0.6.2 or higher, and
soorgeon 0.0.10 or higher.
This tutorial shows how to go from a monolithic Jupyter notebook to a modular, production-ready pipeline deployed in workflow by using the tools in our ecosystem:
Building Docker image
We provide a Docker image so you can quickly run this example:
# get repository
git clone https://github.com/ploomber/soopervisor
cd soopervisor/tutorials/workflow

# build image
docker build --tag ploomber-workflow .

# create a directory to store the pipeline output
export SHARED_DIR=$HOME/ploomber-workflow
rm -rf $SHARED_DIR
mkdir -p $SHARED_DIR

# start (takes ~1 minute to be ready)
docker run -i -t \
    --privileged=true -v /var/run/docker.sock:/var/run/docker.sock \
    --volume $SHARED_DIR:/mnt/project \
    --env SHARED_DIR \
    --env PLOOMBER_STATS_ENABLED=false \
    -p 2746:2746 \
    -p 8888:8888 \
    ploomber-workflow
Note
We need to run docker run in privileged mode since we’ll be running
docker commands inside the container.
More on that here
Upon initialization, JupyterLab will be running at http://127.0.0.1:8888
Refactor notebook
First, we use soorgeon to refactor the notebook:
soorgeon refactor nb.ipynb -p /mnt/project/output -d parquet
We can generate a plot to visualize the dependencies:
ploomber plot
If you open the generated pipeline.png, you’ll see that soorgeon
inferred the dependencies among the sections in the notebook and built a
Ploomber pipeline automatically!
Now you can iterate this modular pipeline with Ploomber, but for now, let’s go to the next stage and deploy to Kubernetes.
Configure target platform
Soopervisor allows you to configure the target platform using a
soopervisor.yaml file, let’s add it and set the backend to
argo-worflows:
# soopervisor add requires a requirements.lock.txt file
cp requirements.txt requirements.lock.txt

# add the taget environment
soopervisor add training --backend argo-workflows
Usually, you’d manually edit soopervisor.yaml to configure your
environment; for this example, let’s use one that we
already configured,
which tells soopervisor to mount a local directory to every pod so we can review results later:
cp /soopervisor-workflow.yaml soopervisor.yaml
Submit pipeline
We finished configuring; let’s now submit the workflow:
# build docker image and generate an argo's yaml spec
soopervisor export training --skip-tests --ignore-git --mode force

# import image to the k8s cluster
k3d image import project:latest --cluster mycluster

# submit workflow
argo submit -n argo --watch training/argo.yaml
Congratulations! You just went from a legacy notebook to production-ready pipeline! 🎉
Note
k3d image import is only required if creating the cluster with k3d.
Once the execution finishes, take a look at the generated artifacts:
ls /mnt/project
Tip
You may also watch the progress from the UI.
# port forwarding to enable the UI
kubectl -n argo port-forward --address 0.0.0.0 svc/argo-server 2746:2746
Then, open: https://127.0.0.1:2746
AWS Lambda
Note
Got questions? Reach out to us on Slack.
AWS Lambda is a serverless compute service. It allows you to deploy functions in the cloud without worrying about servers or scaling. It is a great (and cheap) option to deploy Machine Learning models.
This tutorial shows you how to deploy a Machine Learning model to AWS Lambda. Unlike other frameworks or tutorials, Soopervisor and Ploomber allow you to deploy complete inference DAGs (as opposed to a model file) without changing your training pipeline’s code; handling packaging, containerization and deployment.
If you encounter any issues with this tutorial, let us know.
Training vs. serving pipelines
When training an ML model, you may organize the pipeline in several tasks such as “get data”, “clean data”, “compute feature 1”, “compute feature 2” and “train model”.
To deploy the model, you have to provide both a model file and all the necessary feature generation steps. Soopervisor and Ploomber allow you to create an online inference pipeline from a training one without code changes.
In our case, your inference pipeline includes “compute feature 1” and “compute feature 2”; and adds two new tasks: one to receive the input raw data and another one to load a model and make a prediction using the feature vector.
This tutorial will walk you through the development and deployment process.
Setting up project
We’ll now fetch an example pipeline:
git clone https://github.com/ploomber/projects
cd projects/templates/ml-online/
Configure the development environment:
ploomber install
Then, activate the environment:
conda activate ml-online
Exploring the example code
Before diving into the code, let’s plot our pipeline to have a better idea of its structure:
# required to generate plots
conda install pygraphviz --channel conda-forge --yes

# generate plot
ploomber plot
Open the generated pipeline.png file. The left-most task in the pipeline
obtains data for training, then we have a of couple tasks that generate some
extra feature, a task that joins all features into a single data frame and
one that fits a model.
Those tasks are declared in the src/ml_online/pipeline.yaml file. Open the
file to review the content, you will see that there are two tasks in the
tasks section (to get data and to fit the model), the remaining tasks
are coming from the src/ml_online/pipeline-features.yaml; this separation
allows us to convert the feature engineering portion of the pipeline into
an inference pipeline without code changes.
Note that for this to work, all feature engineering tasks must be Python
functions with a configured serializer and unserializer. The other
tasks can be of any type.
Training a model
Let’s now train a model:
ploomber build
Once the pipeline finishes, copy the trained model from
products/model.pickle to the standard model location:
src/ml_online/model.pickle.
# on linux/mac
cp products/model.pickle src/ml_online/model.pickle
That’s it. We’re ready to export to AWS Lambda.
Generating files
Let’s now create the necessary files to export to AWS Lambda:
soopervisor add serve --backend aws-lambda
Note
You don’t have to install soopervisor manually; it should’ve been
installed when running ploomber install. If missing, install it with
pip install soopervisor.
You have to provide a few details before you can run the model in AWS Lambda.
First, edit the serve/test_aws_lambda.py file. This file contains a
unit test to ensure your model works as expected.
The test case is already configured, you only have to replace the line that
contains, body = None for a sample input value. In our case, it looks
like this:
body = {
    'sepal length (cm)': 5.1,
    'sepal width (cm)': 3.5,
    'petal length (cm)': 1.4,
    'petal width (cm)': 0.2,
}
Important
You should also remove the line that raises the NotImplementedError.
Next, we have to tell Lambda, how to handle an incoming API request, this
happens in the serve/app.py file. The request body is received as a string
but our model receives a data frame as input. The sample code already
implements a “string to data frame” implementation, hence, you only have to
delete the line that raises the NotImplementedError. When you use this
for your own model, write the applicable parsing logic.
To deploy to AWS Lambda, soopervisor packages your code and creates a
Docker image. We can build such Docker image (without actually deploying
to AWS Lambda) to test our API with the following command:
soopervisor export serve --until-build
The command will take a few minutes since it has to create a Docker image, subsequent runs will be much faster.
Once finished, you may start the API locally with:
cd serve
sam local start-api
Open a new terminal and call the API:
curl http://127.0.0.1:3000/predict -X POST -d '{"sepal length (cm)": 5.1, "sepal width (cm)": 3.5, "petal length (cm)": 1.4, "petal width (cm)": 0.2}'
Try calling with other values to get a different prediction
Note
Due to the way the local API is built this will take a few seconds
Congratulations! You just ran Ploomber on AWS Lambda!
Deployment
soopervisor export serve
explain the –guided thing and add some link
you must be authenticated to use lambda, s3, and CloudFormation
About template.yaml
To deploy to Lambda, AWS requires a template.yaml file to specify your
serverless application. A sample file that configures an API Gateway is
provided, but you may need to edit it for your application.
Click here to learn more.
Airflow
Note
This is a quick reference. For a full tutorial, click here.
Step 1: Add target environment
Tip
To get a sample pipeline to try this out, see this.
KubernetesPodOperator
# add a target environment named 'airflow' (uses KubernetesPodOperator)
soopervisor add airflow --backend airflow
Note
Using the --preset option requires soopervisor>=0.7
# add a target environment named 'airflow-k8s' (uses KubernetesPodOperator)
soopervisor add airflow-k8s --backend airflow --preset kubernetes
BashOperator
Important
If using --preset bash, the BashOperator tasks will use
ploomber CLI to execute your pipeline. Edit the cwd argument in
BashOperator so your DAG runs in a directory where it can import
your project’s pipeline.yaml and source code.
# add a target environment named 'airflow-bash' (uses BashOperator)
soopervisor add airflow-bash --backend airflow --preset bash
DockerOperator
Important
Due to a
bug in the DockerOperator,
we must set enable_xcom_pickling = True in airflow.cfg file. By
default, this file is located at ~/airflow/airflow.cfg.
# add a target environment named 'airflow-docker' (uses DockerOperator)
soopervisor add airflow-docker --backend airflow --preset docker
Step 2: Generate Airflow DAG
# export target environment named 'airflow'
soopervisor export airflow
Important
For your pipeline to run successfully, tasks must write their outputs to a common location. You can do this either by creating a shared disk or by adding a storage client. Click here to learn more.
Kubernetes (Argo)
Note
This is a quick reference. For a full tutorial, click here.
Step 1: Add target environment
Tip
To get a sample pipeline to try this out, see this.
# add a target environment named 'argo'
soopervisor add argo --backend argo-workflows
The command above will generate a pre-configured argo/Dockerfile
and a new entry named argo in the soopervisor.yaml file. For
information on the configuration schema, click here.
At the very least, you’ll have to modify repository to point it to the
container repository.
Step 2: Generate Argo Spec (YAML)
# generate argo yaml spec
soopervisor export argo --skip-tests  --ignore-git
The command will build the docker image, push it to the repository
and generate an Argo spec at argo/argo.yaml.
Note that the command above will only export outdated tasks (the ones whose source code has changed since the last execution), to force exporting all tasks:
# force exporting all tasks regardless of status
soopervisor export argo --skip-tests  --ignore-git --mode force
Important
For your pipeline to run successfully, tasks must write their outputs to a common location. You can do this either by creating a shared disk or by adding a storage client. Click here to learn more.
To submit the workflow:
# submit workflow
argo submit -n argo argo/argo.yaml
For more information, refer to Argo’s CLI documentation.
SLURM
Note
This is a quick reference. For a full tutorial, click here.
Step 1: Add target environment
Tip
To get a sample pipeline to try this out, see this.
# add a target environment named 'slurm'
soopervisor add slurm --backend slurm
The command above will generate an entry named slurm in the
soopervisor.yaml file, and a slurm/template.sh file, you can use
the latter to customize how Soopervisor executes the tasks in your pipeline.
Under the hood, Soopervisor executes a sbatch job.sh command for each task
in your pipeline, where job.sh is generated by using template.sh as a template.
For more information and customization options, click here.
Step 2: Submit jobs
To submit the jobs to SLURM:
# submit pipeline to the cluster
soopervisor export slurm --skip-tests --ignore-git
Note that the command above will only export outdated tasks (the ones whose source code has changed since the last execution), to force exporting all tasks:
# force exporting all tasks regardless of status
soopervisor export slurm --skip-tests --ignore-git --mode force
Important
For your pipeline to run successfully, tasks must write their outputs to a common location. You can do this either by creating a shared disk or by adding a storage client. Click here to learn more.
Task communication
Since soopervisor executes tasks in isolated environments, you must provide
a way to pass the output files of each task to upcoming tasks that use them as
inputs.
There are two ways of doing so: either mount a shared disk on all containers,
or configure a File client to use remote storage; we describe both options
in the next sections.
Using remote storage
As an alternative, you can configure a File client to ensure each task
has their input files before execution. We currently support Amazon S3 and
Google Cloud Storage.
To configure a client, add the following to your pipeline.yaml file:
# configure a client
clients:
    # note the capital F
    File: clients.get
tasks:
    # content continues...
Then, create a clients.py file (in the same directory as your
pipeline.yaml) and declare a get function that returns a File
client instance:
from ploomber.clients import S3Client

def get():
    return S3Client(bucket_name='YOUR-BUCKET-NAME',
                    parent='PARENT-FOLDER-IN-BUCKET',
                    json_credentials_path='credentials.json')
from ploomber.clients import GCloudStorageClient

def get():
    return GCloudStorageClient(bucket_name='YOUR-BUCKET-NAME',
                               parent='PARENT-FOLDER-IN-BUCKET',
                               json_credentials_path='credentials.json')
Next, create a credentials.json (in the same directory as your
pipeline.yaml) with your authentication information. The
file should look like this:
{
    "aws_access_key_id": "YOUR-ACCESS-KEY-ID",
    "aws_secret_access_key": "YOU-SECRET-ACCESS-KEY"
}
{
    "type": "service_account",
    "project_id": "project-id",
    "private_key_id": "private-key-id",
    "private_key": "private-key",
    "client_email": "client-email",
    "client_id": "client-id",
    "auth_uri": "https://accounts.google.com/o/oauth2/auth",
    "token_uri": "https://oauth2.googleapis.com/token",
    "auth_provider_x509_cert_url": "https://www.googleapis.com/oauth2/v1/certs",
    "client_x509_cert_url": "https://www.googleapis.com/robot/v1/metadata/x509/service-account.iam.gserviceaccount.com"
}
Note: If you’re using a Docker-based exporter (K8s/Argo, Airflow, or
AWS Batch),you must ensure that your credentials.json file is included in
your Docker image. You can ensure this by adding the following to your
soopervisor.yaml
some-name:
    # tell soopervisor to include the credentials.json file
    include: [credentials.json]
    # continues
You can check your local configuration by loading your pipeline using
ploomber status. If you see a table listing your tasks, it means the
client has been configured successfully.
Furthermore, when executing the soopervisor export command and using
a Docker-based exporter (K8s/Argo, Airflow, and AWS Batch), Soopervisor
will check that the File client in the Docker image is correctly configured
by trying to establish a connection with your credentials to the remote storage.
Docker building process
Note
This guide does not apply if using SLURM.
Installing dependencies
To install dependencies in the Docker image, Soopervisor looks for a
requirements.lock.txt (if using pip) or an environment.lock.yml
(if using conda). Although not strictly enforced, such files should contain
specific versions of each dependency so that breaking changes from any
dependency do not break the pipeline. For example, if your project uses
ploomber, pandas, and scikit-learn; your dependencies may look like
this:
ploomber
pandas
scikit-learn
dependencies:
  - ploomber
  - pandas
  - scikit-learn
The lock files generated from such files look like this:
ploomber==0.11
pandas==1.2.4
scikit-learn==0.24.2
# many other lines...
dependencies:
  - ploomber==0.11
  - pandas==1.2.4
  - scikit-learn==0.24.2
  # many other lines...
You can generate such files with the following commands:
pip freeze > requirements.lock.txt
conda env export --no-build --file environment.lock.yml
Tip
If you use ploomber install, lock files are automatically
generated.
Included files
To export to any of the supported platforms, Soopervisor creates a Docker image from your project. In most cases, there are files in your project that you want to exclude from the Docker image to reduce its size. Common examples are: virtual environments, data files, or exploratory notebooks.
The process to determine which files to include changes if your project isn’t
a package (i.e., there isn’t a setup.py file) file or it is a package.
Non-packaged projects
If your project isn’t a package and you’re using git, Soopervisor copies every file tracked by your repository. To see the list of currently tracked files, run the following command:
git ls-tree -r HEAD --name-only
This means that you can control what file goes into the Docker image by changing
your .gitignore file. If there are git tracked that you want to
exclude, use the exclude key in soopervisor.yaml
some-target:
    exclude:
        - file-to-exclude.txt
Note
If you’re not using git, all files are copied into the Docker image by
default. You can control what to exclude using the exclude key.
If there are files that git ignores but you want to include, use the
include key:
some-target:
    include:
        - file-to-include.txt
Tip
It’s recommended that you use .gitignore to control which files
to exclude. The include and exclude keys in soopervisor.yaml
should only be used to list a few particular files.
Packaged projects
If your project is a package (i.e., it has a setup.py file), a
source distribution
is generated and copied into the Docker image. This implies that the process to
control which files are included is the same used to control which files
to include in a source distribution. Unfortunately, there is more than one way
to do this. The most reliable way is to use a MANIFEST.in file,
click here to learn
more.
Tip
You can use ploomber scaffold --package to quickly generate a
pre-configured base packaged project. You can then modify the
MANIFEST.in file to customize your build.
Non-packaged vs Packaged
Soopervisor supports two types of projects: non-packaged and packaged.
Non-packaged
Non-packaged are simpler projects that require fewer configuration files. They
only need a pipeline.yaml file to be valid. Non-packaged projects are a
good option for small projects. To create one:
# create a base non-packaged project
ploomber scaffold
Packaged
Packaged projects have more structure and require more configuration files. The main advantage is they allow you to organize your work better.
For example, if you have some Python modules that you reuse in several files,
you must to modify your PYTHONPATH or sys.path to ensure that such
modules are importable. If your project is packaged, this isn’t necessary,
since you can install your project with pip:
pip install --editable path/to/myproject
After installation, you can import modules from your project anywhere in a Python session, notebook, or other modules inside your project, making it simpler to create modular code.
To create a base package project:
# create a base packaged project
ploomber scaffold --package
Command line interface
Soopervisor has two commands, add and export.
soopervisor add
Adds a new target environment:
soopervisor add {name} --backend {backend}
{name}is any identifier you want to identify this configuration{backend}is one ofaws-batch,aws-lambda,argo-workflows,airflow, orslurm
The command adds a new section in a soopervisor.yaml file (creates one if
needed) with the {name}, and adds a few necessary files in a {name}
directory.
Example:
soopervisor add train-cluster --backend argo-workflows
soopervisor export
Exports a target environment:
soopervisor export {name}
Where {name} is the name of a target environment.
soopervisor export has a few options.
Execution mode: --mode {mode}/ -m
incremental(default) only export tasks whose source has changed.regularall tasks are exported, status (execute/skip) determined at runtime.forceall tasks are exported and executed regardless of status.
Example:
soopervisor export train-cluster --mode force
--ignore-git / -i
Note
--ignore-git has no effect when using SLURM
If you are using soopervisor inside a git repository, soopervisor will
only copy the files tracked by your repository into the Docker image. For
example, if you have a secrets.json file, but your .gitignore file
has a secrets.json entry, soopervisor wil not copy it to the Docker
image. If you pass --ignore-git, the status of your git repository is
ignored and all files are copied.
Example:
soopervisor export train-cluster --ignore-git
--skip-tests / -s
Note
--skip-tests has no effect when using SLURM
Soopervisor tests the pipeline before submitting, for example, it checks that
a File.client is configured, use this flag to skip docker image tests:
Example:
soopervisor export train-cluster --skip-tests
Kubernetes
Configuration schema for Kubernetes.
Example
k8s-config:
  exclude: [my-venv/]
  repository: my-docker.repository.io/some-name
  mounted_volumes:
    - name: shared-folder
      spec:
        hostPath:
          path: /host
The above soopervisor.yaml, translates into the following Argo spec:
  apiVersion: argoproj.io/v1alpha1
  kind: Workflow
  spec:
    templates:
      script:
        volumeMounts:
        - mountPath: /mnt/shared-folder
          name: shared-folder
          subPath: ''
        # continues ...
    - dag:
        tasks:
          # continues...
    volumes:
    - hostPath:
        path: /host
      name: shared-folder
Schema
- class soopervisor.abc.AbstractConfig
Abstract class for configuration objects
- Parameters
preset (str) – The preset to use, this determines certain settings and is backend-specific
- class soopervisor.argo.config.ArgoConfig
Configuration for exporting to Argo
- Parameters
repository (str) –
Repository for uploading the Docker image.
Important
If
repositoryisnull, it sets theimagePullPolicyin the generated spec toNever.mounted_volumes (list, optional) – List of volumes to mount on each Pod, described with the
ArgoMountedVolumesschema.
- class soopervisor.argo.config.ArgoMountedVolume
Volume to mount in the Pod at
/mnt/{name}- Parameters
name (str) – Volume’s name
sub_path (str, default='') – Sub path from the volume to mount in the Pod (set in
volumeMounts[*].subPath). Defaults to the volume’s rootspec (dict) – The volume spec, passed directly to the output spec. e.g:
{'persistentVolumeClaim': {'claimName': 'someName'}}
SLURM
The template.sh file
When using SLURM as backend, the soopervisor add {env-name} command wil create an
{env-name}/template.sh file.
Under the hood, Soopervisor uses the template.sh for all tasks in your
pipeline and executes a sbatch job.sh command for each one.
template.sh contains two placeholders {{name}} and {{command}},
these placeholders are mandatory and should not be removed, at runtime
Soopervisor will replace them with the name of the task and the command
execute, one per task in your pipeline. However, you may add other commands
to template.sh to customize execution. Typically, you’ll have to add any
preparation steps, like activating a virtual environment:
#!/bin/bash
#SBATCH --job-name={{name}}
#SBATCH --output=result.out
#

# activate conda environment
conda activate myenv
# execute task
srun {{command}}
Customizing task execution
You may want to use different settings for each task in your
pipeline in some scenarios. To achieve that, you can add more files next to the
template.sh file, and Soopervisor will choose which one to use depending
on the task’s name.
The resolution logic is as follows. Say you have a task named fit-gpu:
Look for an exact match (i.e.,
fit-gpu.sh)Look for a file with a double underscore placeholder (e.g.,
fit-__.sh, or__-gpu.sh)If no matches, use
template.sh
You can use this templating feature to customize the submitted jobs, for example
to pass custom parameters to the srun command.